
J.S. Leonard is the author of the Modern Rituals urban fantasy series and hosts/produces Bleeding Ink, a podcast for indie authors. Our own Ferol Vernon was recently featured on the podcast – check out the interview and enter to win a free Freebooksy or Bargain Booksy feature.
Plot by the Seat of Your Pants
Three weeks ago, a friend of mine had plunked down to write her next novel. With elated fingers her inner muse fueled every word, singing for three pages—and then silence. An eternity of hair pulling followed.
She suffered from a case of “pantsing gone wrong.” You’ve been there, helpless to an idea that abandoned you as quickly as it took hold. Epiphany like this is a unicorn: rare, unruly, essential to remarkable prose, and often incompatible with long-form writing.
What she didn’t know is that she could have saddled that magical beast. There’s the age-old distinction between two writing styles: plotting and pantsing. Some writers swear they cannot write if they know where they are headed and write by the seat of their pants. Plotters are cartographers, etching every narrative detail into a map before bleeding ink. Both approaches are lovely and need not be exclusive—this article will teach you how to ride a unicorn over charted terrain.
The key is to leave room for epiphany when heading to the next waypoint. Your muse may then sing toward the next map marker, and then the next and next until you have completed your manuscript. Plotters use outlines to sketch out these waypoints—and pansters discover as they write their characters. Scrivener give us tools to please both mindsets.
[ASIDE: A friendly book that teaches you how to work your manuscript through inch by inch windows is Anne Lamott’s Bird by Bird]
1. Understand Scrivener’s Interface
If you are unfamiliar with Scrivener’s interface, fear not! There are three features you need to know before churning our your master outline.
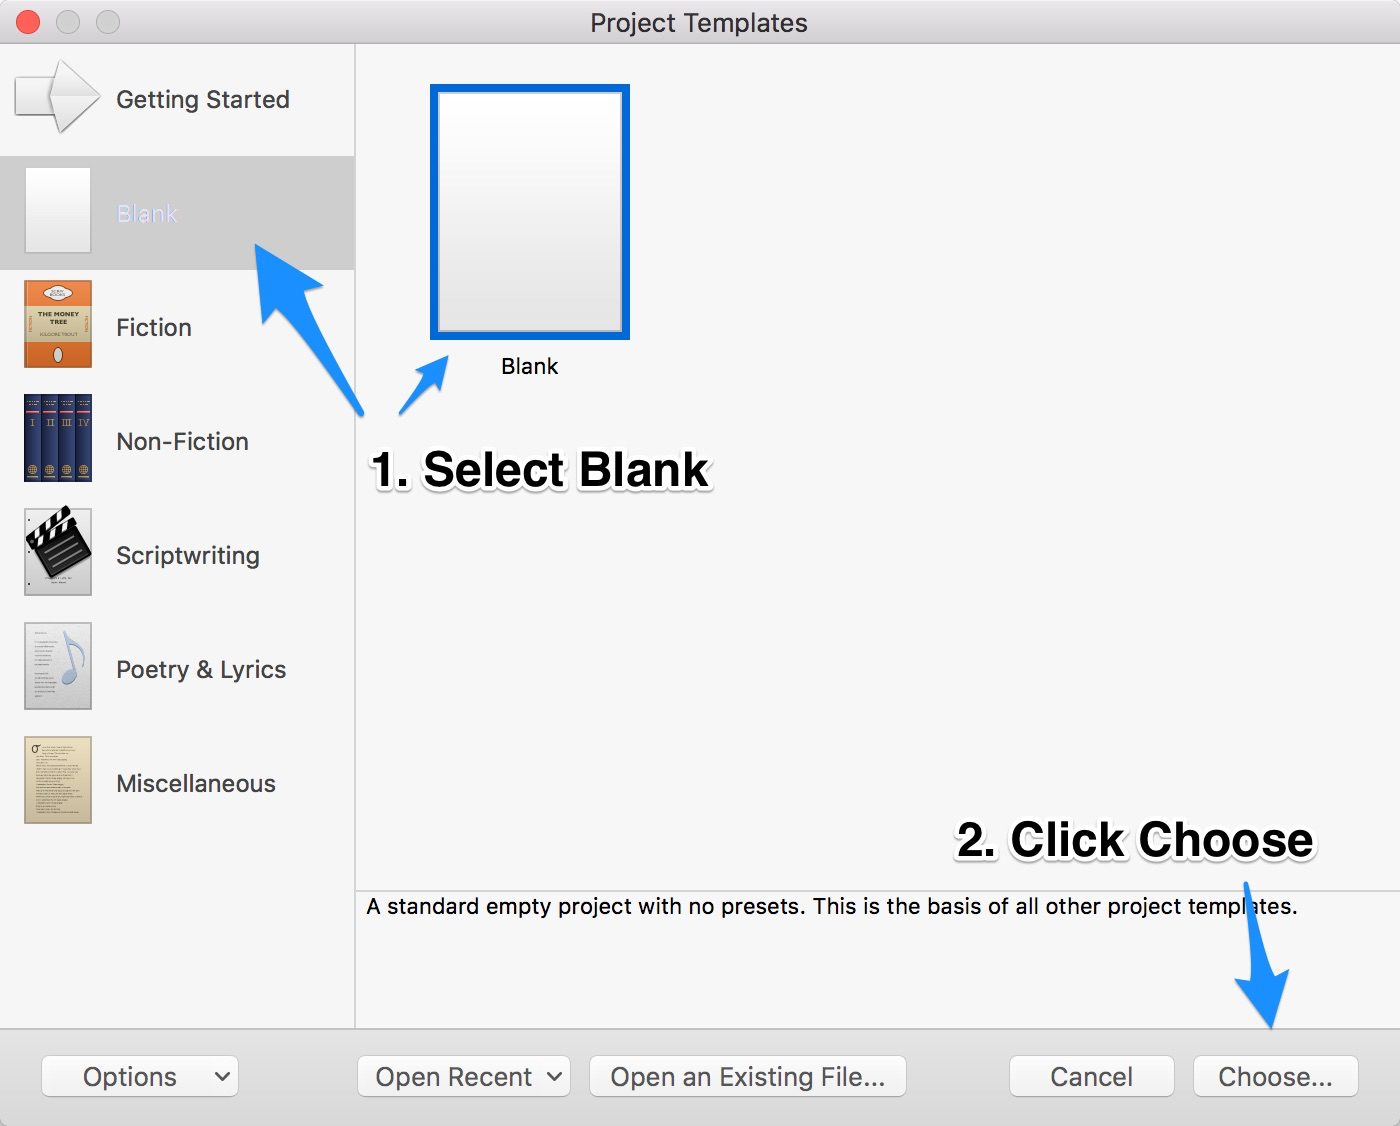
Open Scrivener and create a “Blank” project.
The Binder
Writers who come from Word or a linear word processor struggle with the Binder.
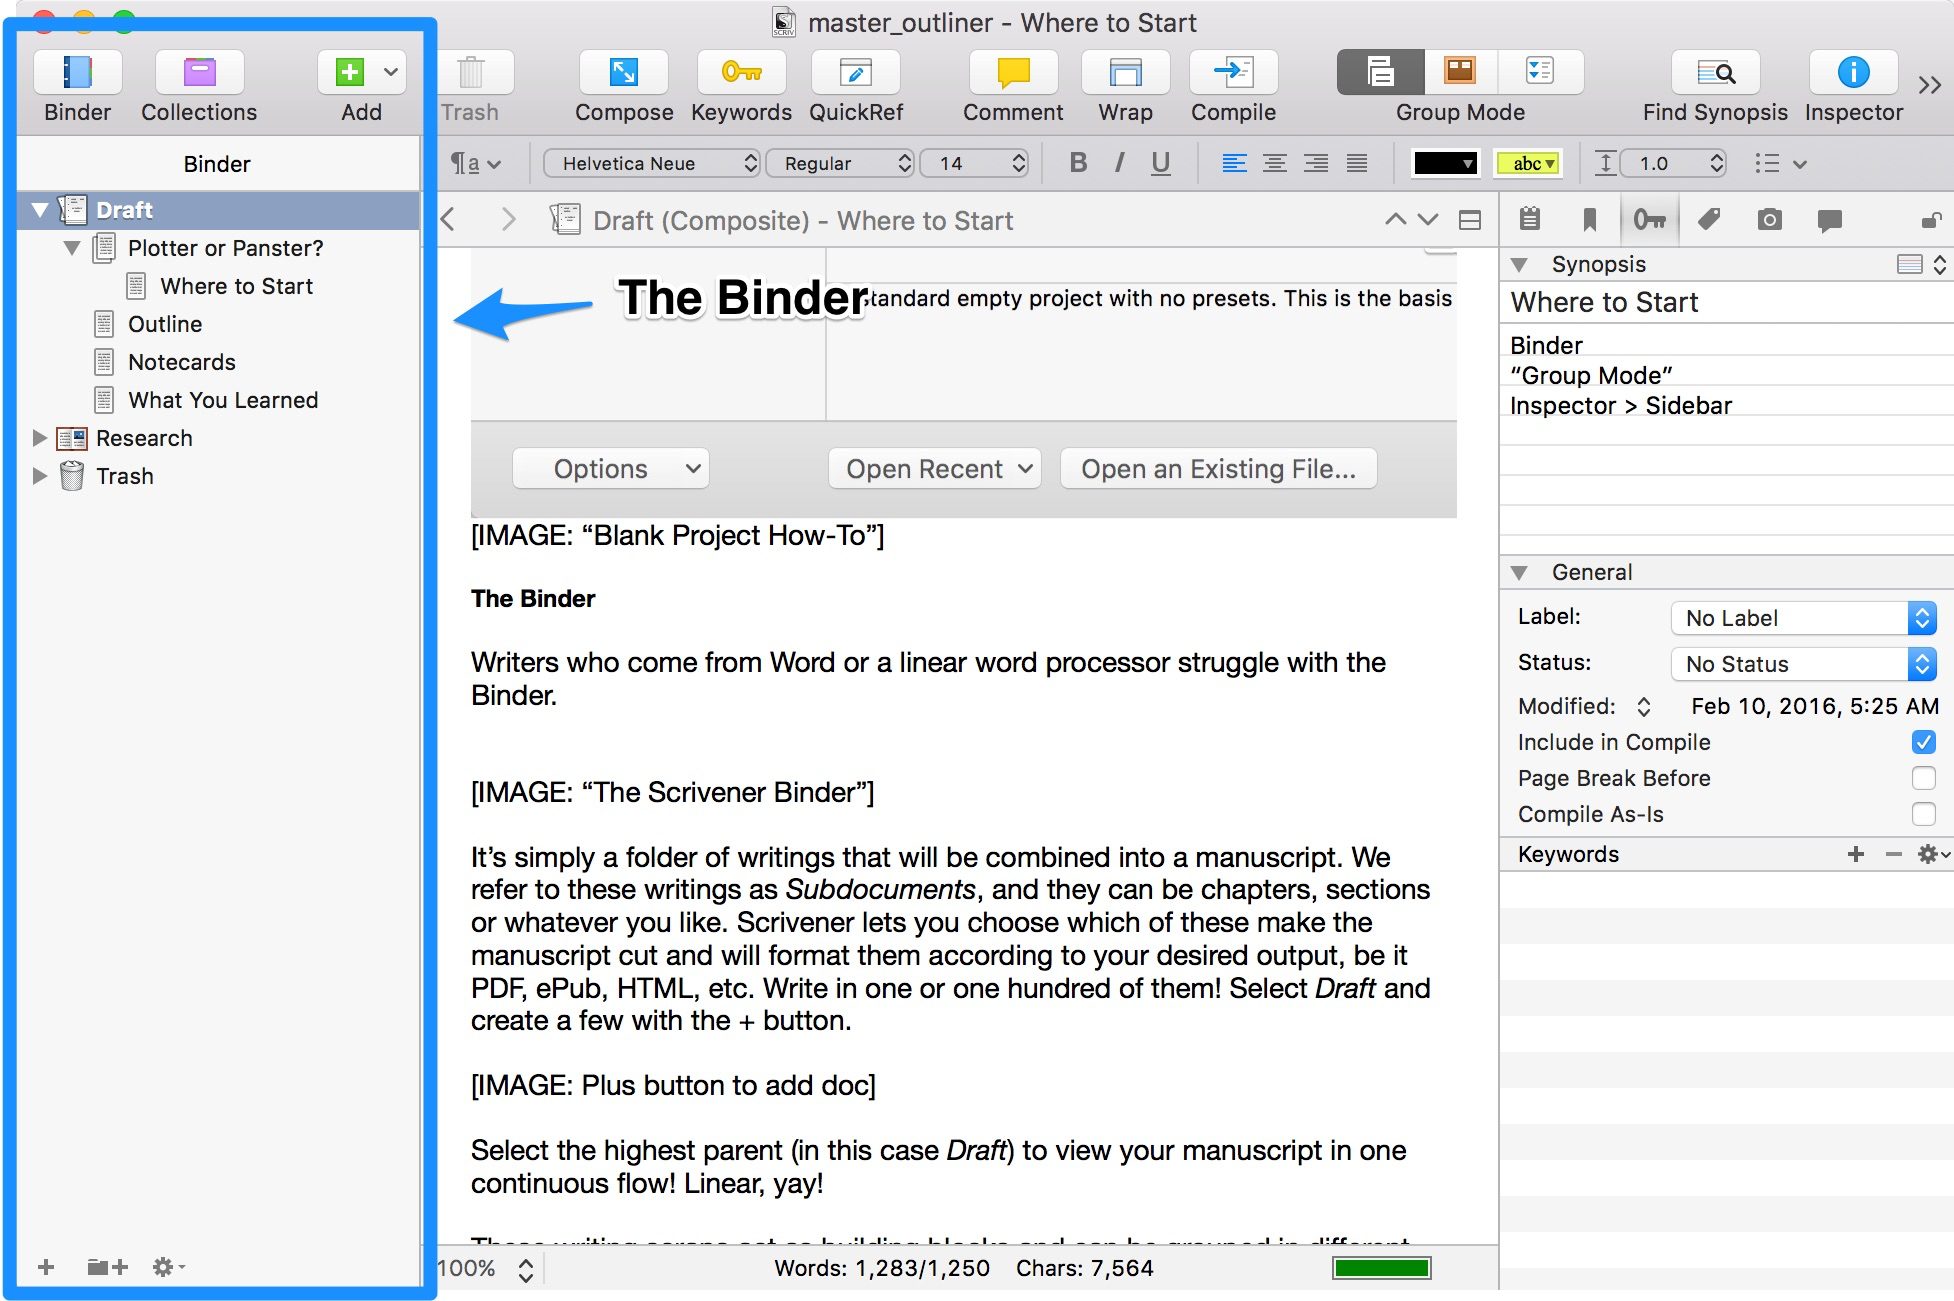
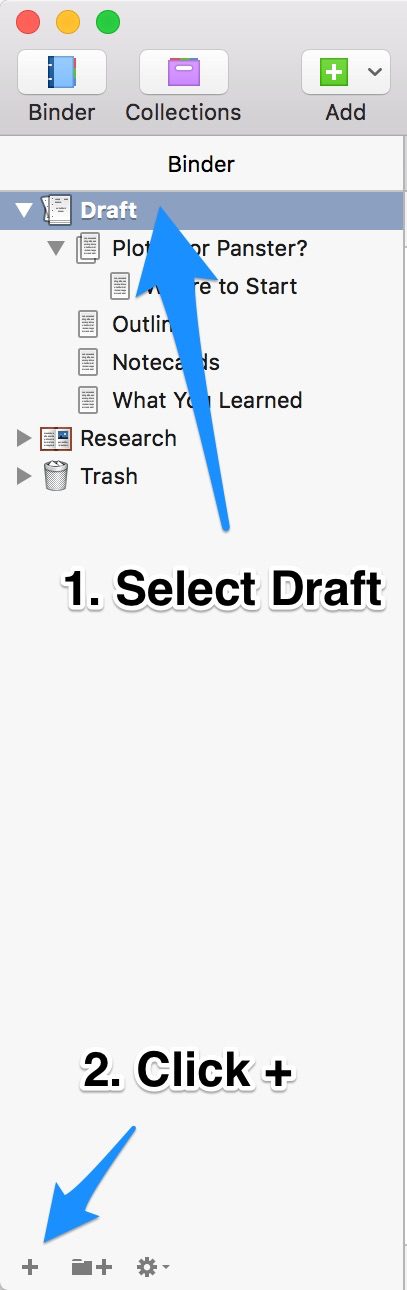
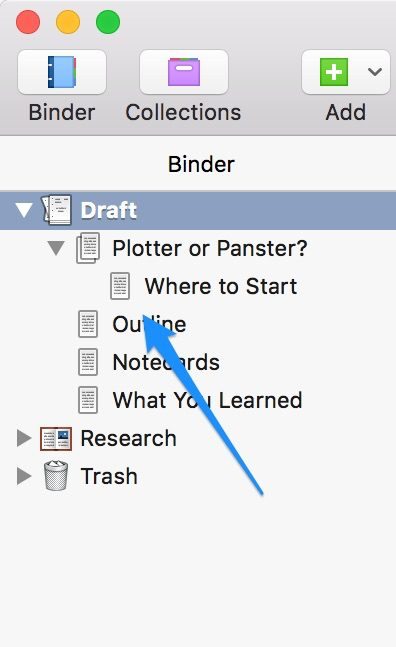
It’s simply a folder of writings—Scrivener nicknames them “scrivenings”—that will be combined into a manuscript. We refer to these writings as Subdocuments, and they can be chapters, sections, beats or whatever you like. Scrivener lets you choose which of these make the manuscript cut and will format them according to your desired output, be it PDF, ePub, HTML, etc. Write in one or one hundred of them! Select Draft and create a few with the + button.
Select the highest parent (in this case Draft) and then the first “Group Mode” (see below) to view your manuscript in one continuous flow! Linear, yay!
These writing scraps act as building blocks and can be grouped in different ways. Hint: If you don’t see the Binder, make sure the “Binder” button in the upper left is toggled on.
Group Mode
“Group Mode” gives you different viewpoints from which to analyze your writings (Subdocuments).
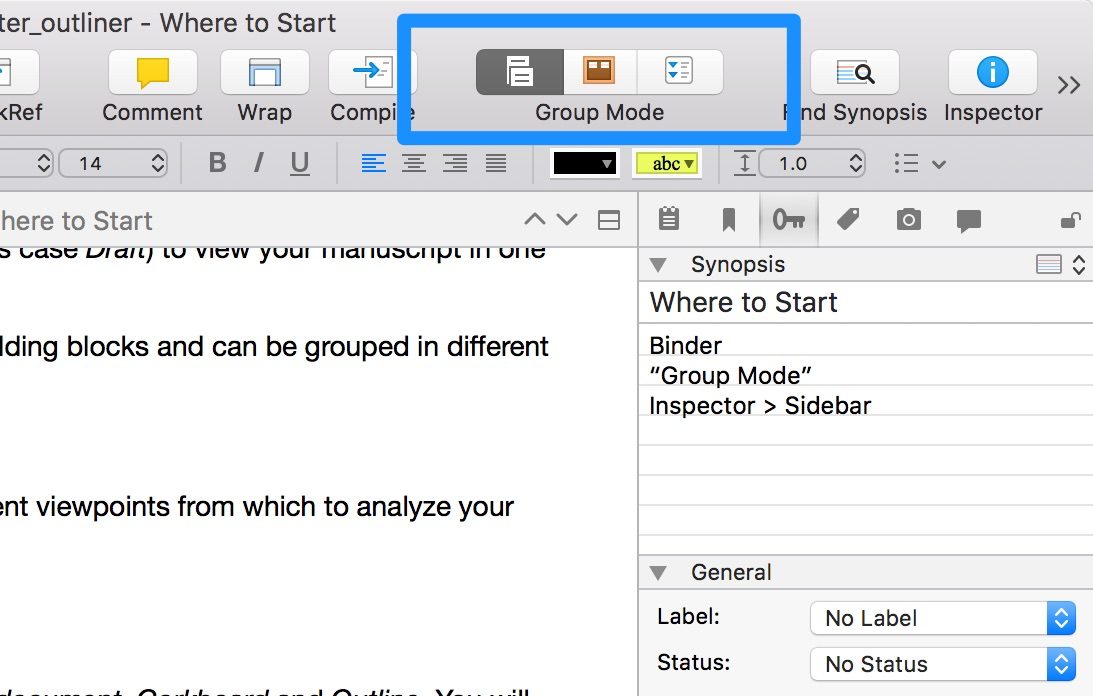
From left to right, we have Subdocument, Corkboard and Outline. You will write in Subdocument mode, you will rearrange in Corkboard mode, and you will outline in—yes—Outline mode.
[ASIDE: If you ever get stuck on Scrivener’s interface, always see what’s selected in the Binder and make sure you are in the correct “Group Mode”]
The Inspector
The Inspector applies itself to whatever is selected in the Binder and provides a load of nifty tools to organize your manuscript.
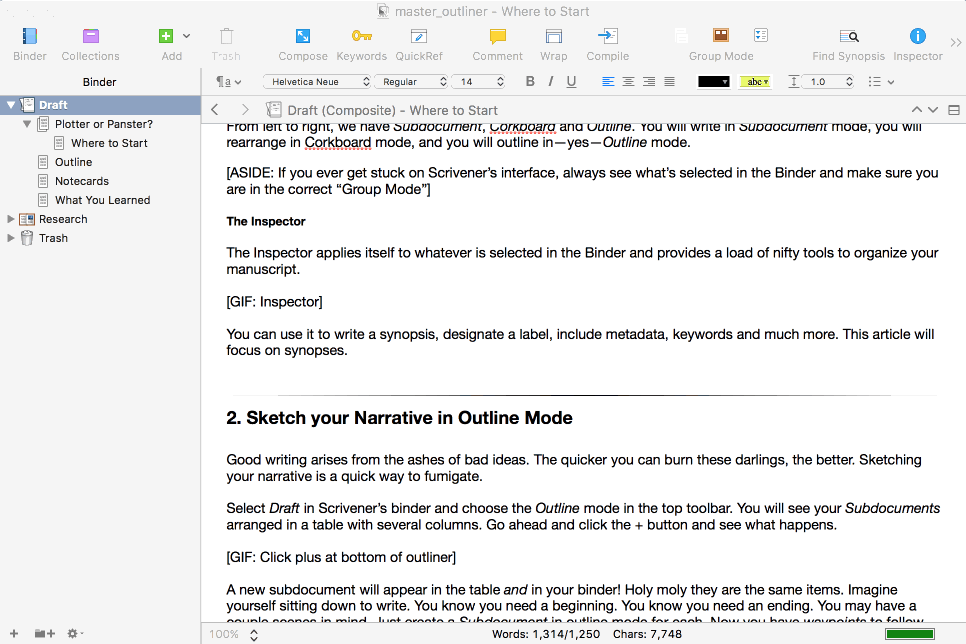
You can use it to write a synopsis, designate a label, include metadata, keywords and much more. This article will focus on synopses.
2. Sketch your Narrative in Outline Mode
Good writing arises from the ashes of bad ideas. The quicker you can burn these darlings, the better. Sketching your narrative is a quick way to fumigate.
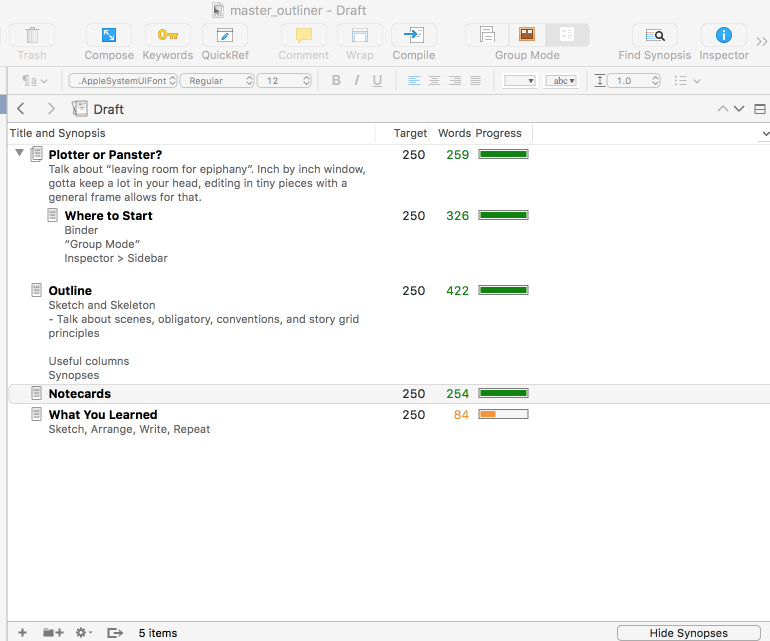
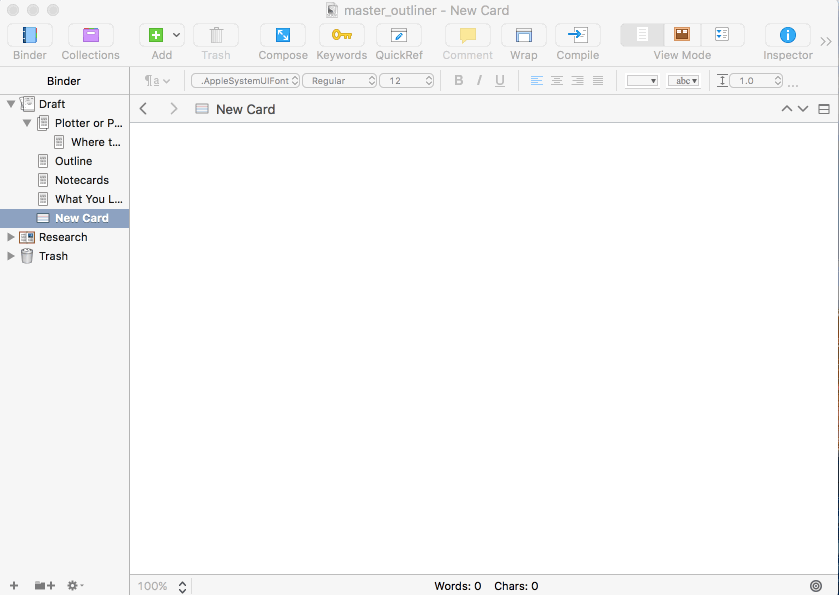
Select Draft in Scrivener’s binder and choose the Outline mode in the top toolbar. You will see your Subdocuments arranged in a table with several columns. Go ahead and click the + button and see what happens.
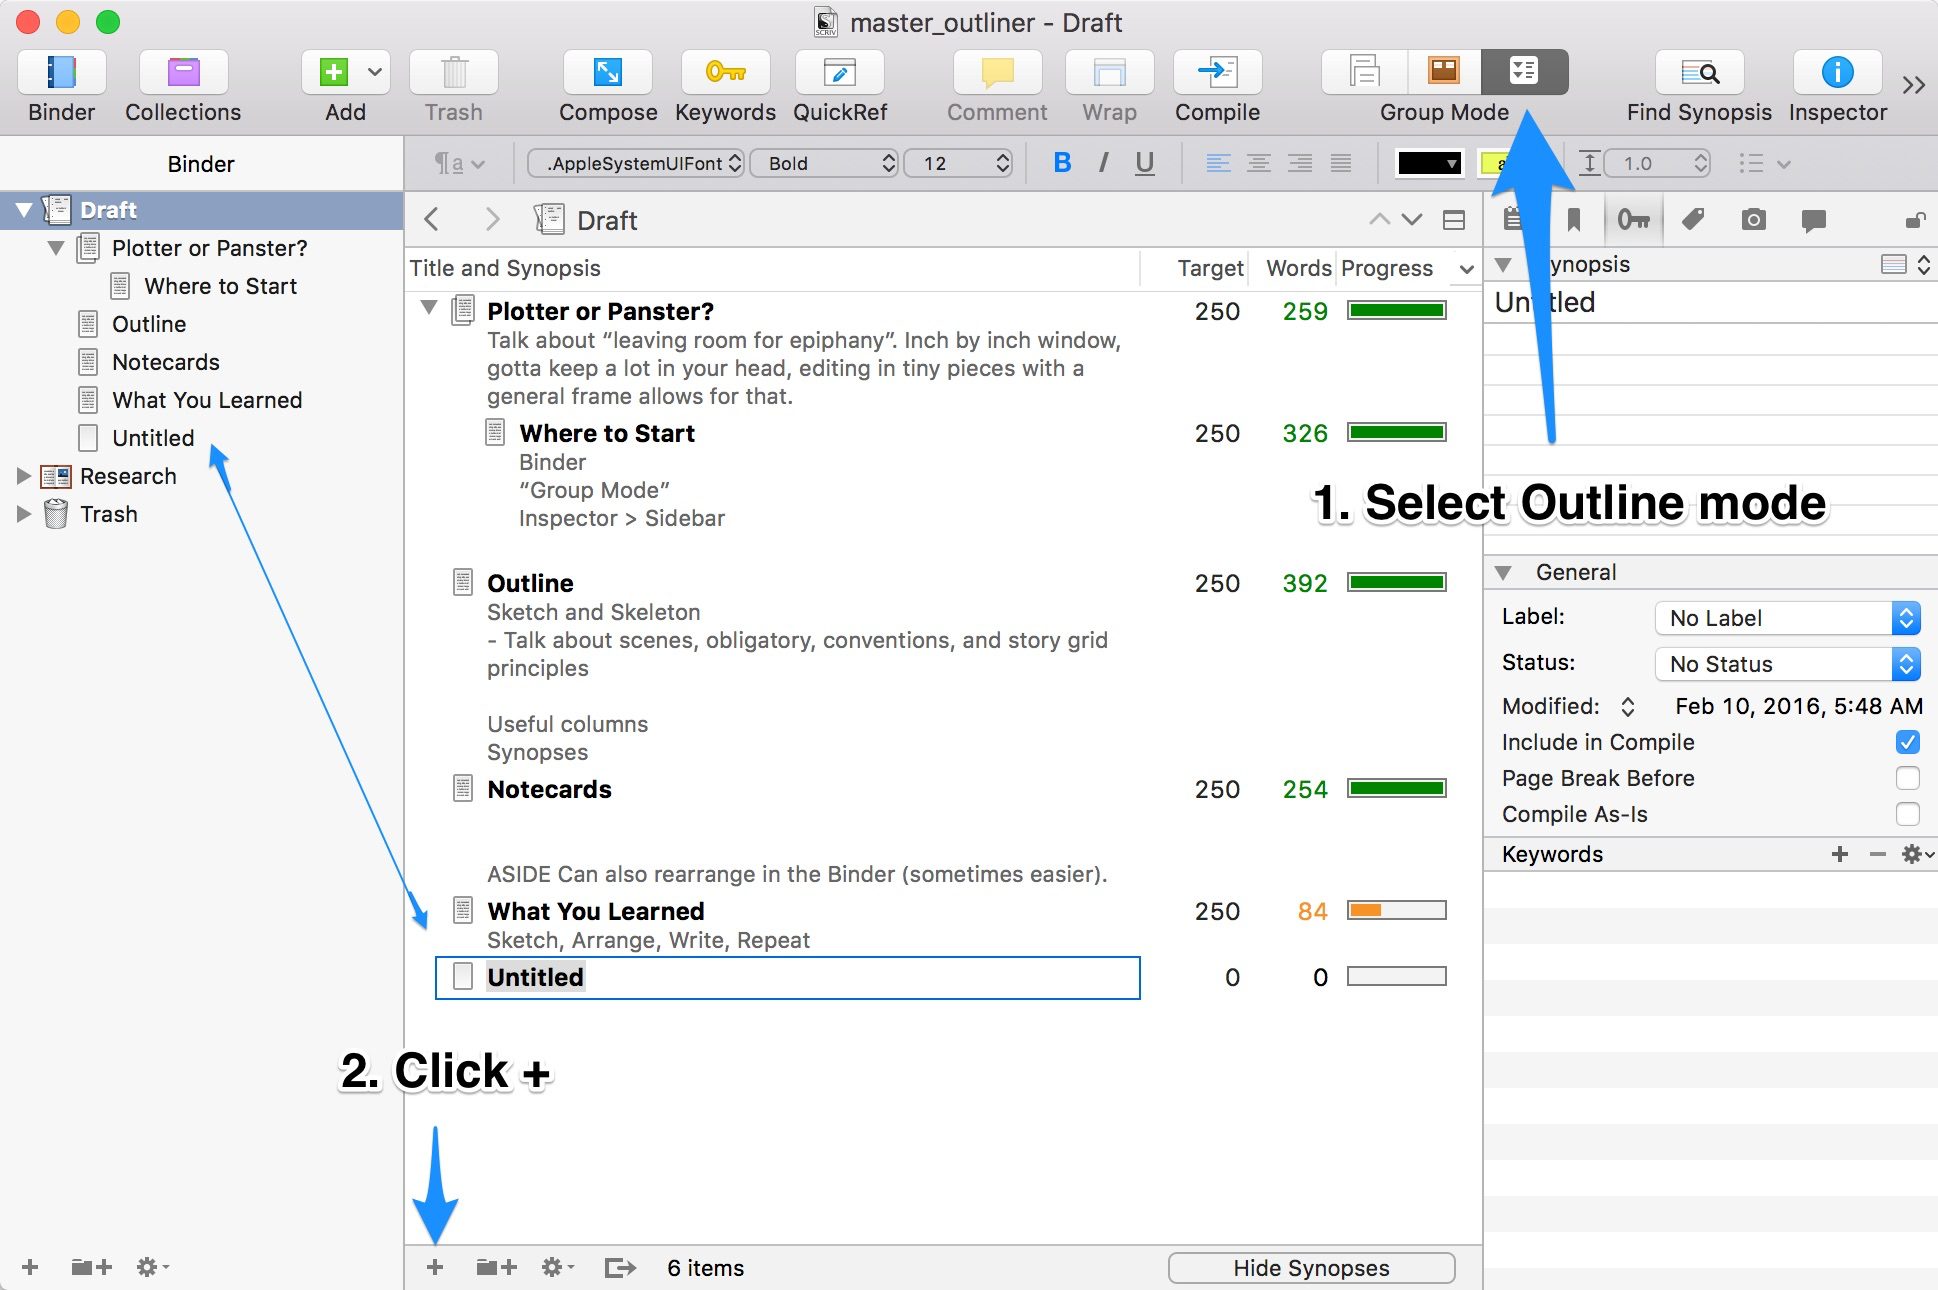
A new subdocument will appear in the table and in your binder! Holy moly they are the same items. Imagine yourself sitting down to write. You know you need a beginning. You know you need an ending. You may have a couple scenes in mind. Just create a Subdocument in outline mode for each. Now you have waypoints to follow. Congratulations, you are an outliner.
If you are a fan of The Story Grid, or another book on narrative structure, you will immediately recognize how quickly you can jot down obligatory scenes. These form your narrative skeleton that will go a long way to meeting reader’s expectations.
[ASIDE: Some people prefer to have every scene sketched out before writing. Others might need one or two. I prefer a looser outline—it leaves room for epiphany while keeping the goal in sight.]
Dragging a document onto another in any “Group Mode” nests Subdocuments. Scrivener can then designate a document’s level and assign it a format, i.e. root level documents might be formatted as chapters and their children as numbered scenes. It’s powerful. Treat nesting with caution as too many levels can lead to a confusing document. I like to keep a strict limit to 2-3 levels at most.
Useful Columns
Outline items can display a number of useful columns. I like to add Target, Word, and Progress. Right-click on any column name and check the boxes you’d like to include. There are a lot of great options to play with.
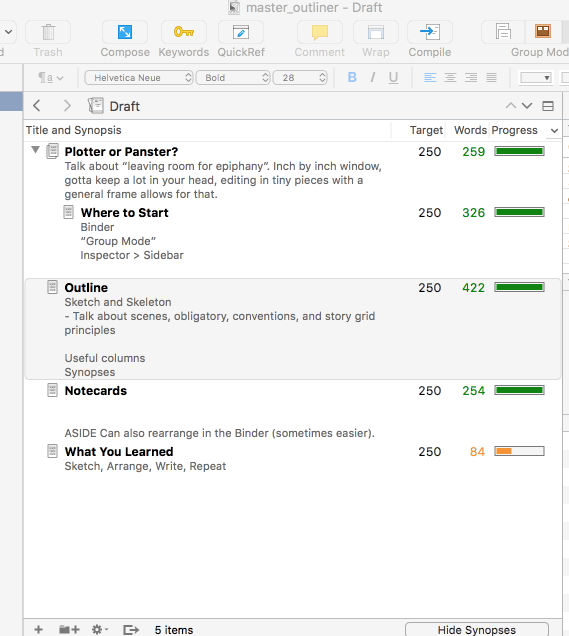
Synopses
Including a log line for each Subdocument can act as helpful reminders when returning to a waypoint. These can be placed in a Subdocument’s Synopsis in the Inspector. Go ahead and select any item in your outline and open the Inspector panel.
Scribble in a brief synopsis and don’t worry if it makes sense—we will refer to it in the next section.
3. Rearrange in Notecard Mode
As your Scrivener project grows more complex, as scenes stack on scenes, long scrawls trace and converge, you may find your scene order crippling your narrative drive. Master writers have a trick to fix these problems: notecards. They write the gist of a scene on a notecard, place them in order on a large table and go about rearranging them until the story works. Scrivener makes this task dead simple.
Select Draft in the Binder and then click on the Corkboard outline mode.
And voila! Subdocuments as notecards! Remember when I related Subdocuments to building blocks—this is what I meant. Non-linear writing allows Scrivener to present different views so that you may address common structural issues.
Go ahead and drag the last notecard to the left of the first notecard. See how they swap order? If you drag on to a notecard, it will stack the documents. Each stack represents a nested relationship in the Binder.
Like Outline mode each synopsis is visible on the notecard. Double-click a stack of cards to “zoom” into the stack and isolate those documents. Referring to the Binder can save you a lot of frustration when navigating your manuscript!
[ASIDE: You can also rearrange in the Binder! When you get a feel for this, you may find you don’t need to use Corkboard mode at all. Go ahead and drag a document around in the Binder to see what happens.]
4. Go forth, Master Outliner
This article covered the three “group modes” Scrivener offers, and explained how those modes help you outline and write by the seat of your pants. This technique works best for me:
- Sketch Scenes in Outline Mode
- Write Scenes
- Rearrange Scenes in Corkboard Mode (if needed)
- Repeat
Bouncing back and forth between outlining and writing leaves room for epiphany and keeps your narrative intact. Potential problems appear early and you’ll spend fewer precious hours fixing them.
Feel free to post questions and I’ll be happy to answer them. Thanks for reading!
Life (writing) altering help!
I’ve owned Scriviner for a year and while I have figured out a few actions your post provides a deeper understanding.
I’m looking forward to moving my Word doc into Scriviner to help with the manuscript.
In writing, ~ Richard
Richard E Todd, author, speaker, golfer
Is this the PC or Apple version of Scrivener?
It is the Apple version @jim. The features I discuss should apply to both versions.
Is there any way to share Scrivener documents between my imac and airbook?
Hi Michael,
I use Dropbox to share my Scrivener docs across devices. It can get be somewhat cumbersome as Scrivener doesn’t allow two documents to be open at the same time, but it does the job.
JS Leonard
Hi,
What you think about Scrivener links ? I mean I can hyperlink each character to the character notes on the left. My main question is there a way to replace all words for example John with a hyperlink ?
Adam
Scrivener links are great. Doesn’t look like there’s a “Replace All” feature for links, but you can search them by going to Edit > Find By Formatting and choosing the following: https://www.evernote.com/l/AOl56mV8yMxEOah5Cqwn3M2Bj2AkGoij3S8
Good luck!
Thank you! I could not figure out how to write an outline in Scrivener, and your article really helped!