Facebook was once again named the most popular social media platform in 2022. Authors are acting accordingly, taking advantage of the platform’s vast audience to get books in the hands of new readers.
If you’re already using Facebook for its Author Pages, great. If not, it’s time to tap into this venue for readership!
In October 2022, Facebook rolled out a new page experience on Facebook, and most pages have now been transitioned. The big changes? Everything is much more simple and uniform in the new Facebook page experience.
Updating your page can be a bit of a hassle, but don’t worry, we have you covered. Set aside 15 minutes, grab a cup of coffee, and check out these tips to help your Author Page get more engagement and get your books into the hands of more readers! Don’t have a Facebook Author Page yet? Check out our post on how to create one.
How To Tell What Facebook Page Experience You Have
Before we get to specifics, we need to make sure we’re starting in the right spot. Some authors will still be on the classic Facebook page experience, and some will be on the new. Here’s how to find which experience you have:
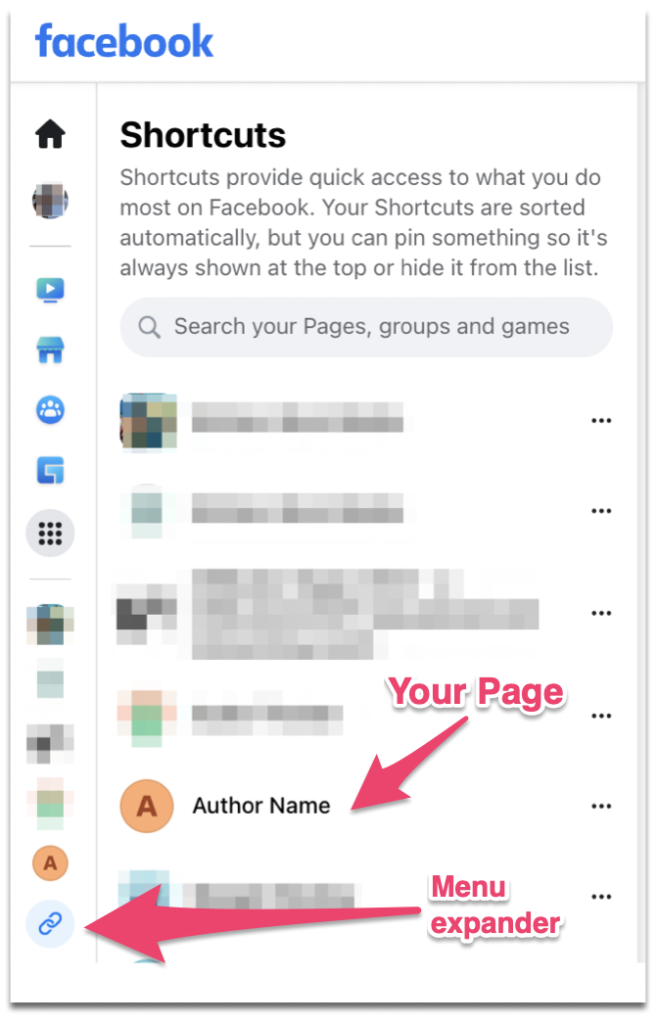
- Log in to Facebook, and navigate to your page. It will be listed on the left side of your screen, you may need to click on the chainlink to expand the “shortcuts” menu.
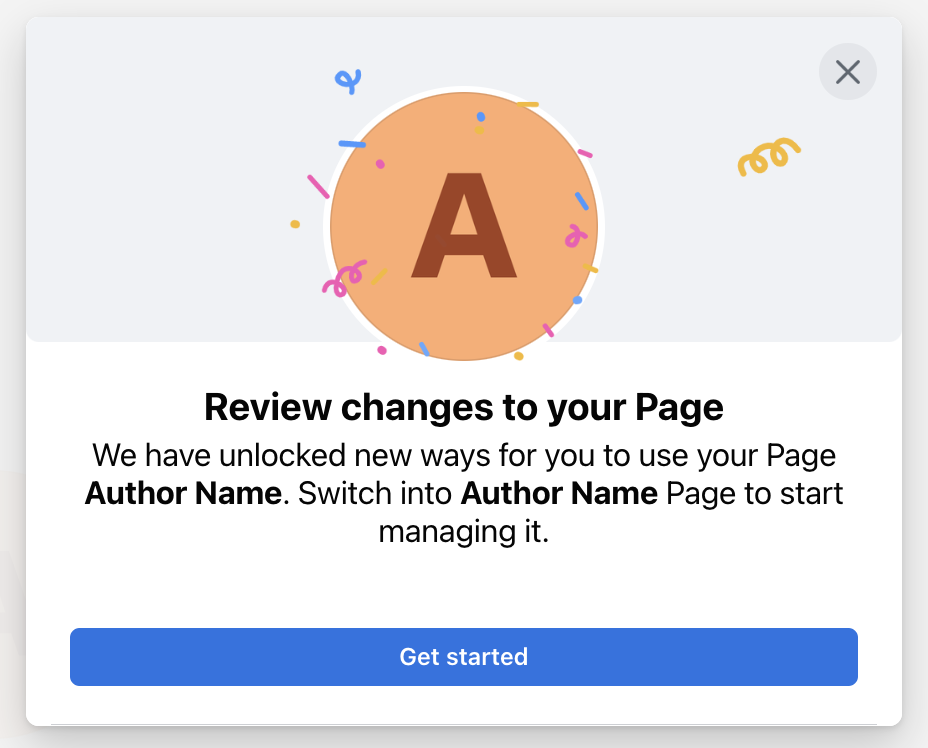
- Click on your page. Do you see any notifications saying you have been switched to the new page experience? If so, you have the new Facebook page experience. If not, let’s keep looking.
Example of new page experience notification - If you still haven’t seen anything about being switched to the new page experience, take a look at your page. Do you see buttons for “promote”, “manage”, and “edit” in on right side like the screenshot below? If so, you are on the new page experience.
- If you are on the classic page experience, jump to our section below on changing your template. If you are on the new page experience. Keep reading to learn how to optimize your Facebook author page.
How To Optimize Your Facebook Author Page
Optimizing your Facebook page means putting forward the information readers want in the best, most efficient way possible. When optimizing your page it helps to imagine that you are a reader. Why are you on an author’s Facebook page? What are you looking for?
By putting yourself in the shoes of your readers, you will be better able to create a page that gets the results you want.
Select “Author” as your Facebook page category
To begin, we want to define what your page represents, and the best way to make this clear to readers is to categorize your page.
How to categorize your Facebook page:
- Click “about” at the top of your page, under your cover photo.
- If you want to change your page’s category, click the pen on the right side.
- Search for your category (we recommend “author”), and select it.
- Hit “save.”
Choose an eye-catching cover photo
One of the first things a reader sees when the visit your page is the cover photo across the top of their screen. Use a tool like Canva to create an image that has good color, but is not too busy. Bonus points if you are able to promote a book or include a call to action in the image.
Your Facebook cover photo should be around 851px wide and 315px tall. Click here for Facebook’s exact guidelines.
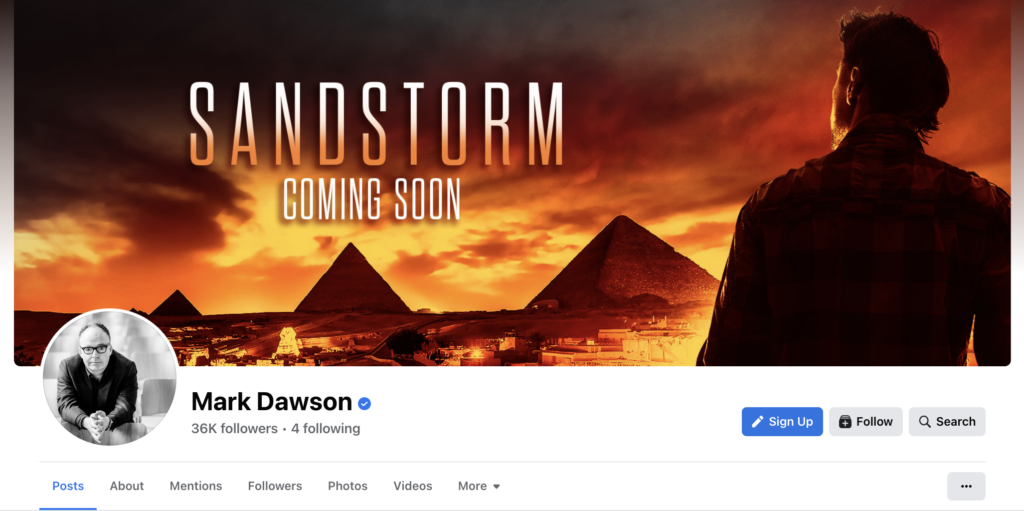
Mark Dawson does a great job with his cover photos. The one below has brilliant color, promotes an upcoming release, and works well with the positioning of the profile photo on the bottom left. The image is eye-catching, but a reader can understand the entirety of it in a quick glance. It’s not so busy as to distract from the rest of the page.
Use a real headshot as your profile photo
To update your page’s profile photo, simply click on it and follow the prompts.
Our recommendation is that you use a real photo of yourself for this photo. Readers who visit your page want to connect with you. They value the human behind the work, and by using a real photo of yourself, you can deepen that connection.
Of course some authors won’t be comfortable with this, and that’s absolutely fine. But, if you’re ok with using a real photo, you should.
Write a 100 character intro/ bio
One big change with the new Facebook page experience is the intro text is much shorter than the old experience. So, if you’ve been transitioned to the new experience, you will want to be sure to update this.
How to update your Facebook page bio:
- Select “edit” in the top right of your page and scroll in the window until you see “bio.”
- Select the “edit” text to the right of “bio” and write your 100 character intro.
- Select “save.”
Your bio can be 100 characters max, but you don’t need to use it all. Write a short intro about yourself, consider including your genre, or use it as an opportunity to promote your email list.
Looking at what other authors in your genre are doing here can be helpful when coming up with ideas.
Edit your action button to meet your goals
Your action button is your primary call to action (CTA) on your page, and you get to customize it.
But, before you do, decide on your primary goal for the page. Do you want readers to join your email list? Go to your website? Buy a book directly from you?
Decide on your ideal goal, and then select the action button that meets your needs.
How to customize your Facebook page action button:
- Select the three dots under your cover image on the right side.
- Click add or edit action button from the menu.
- Choose the action button you want from the options. Many authors will choose the “sign up” option and include a link to their email signup form, but others will choose another option. Pick what works best for you. You can always change later on.
Adjust your page tabs
The old page experience provided templates with different layouts to choose from. The new page experience is a little more limited, but it still has some customization options for authors.
How to customize your Facebook page tabs:
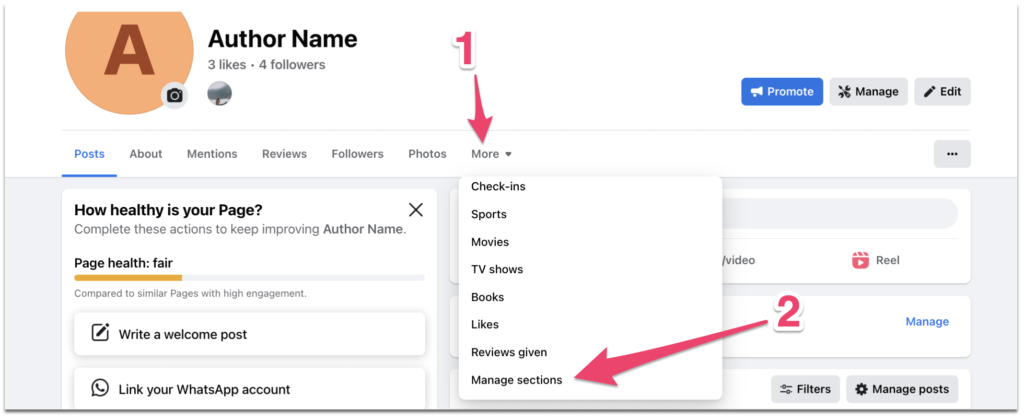
- Select “more” in the top middle of your page and scroll down the menu until you see “manage sections.”
- Click on “manage sections.”
- Here, most options will be greyed out and you will be unable to edit them, but you can check or un-check other options to have them appear on the page. For authors, it’s likely that sections like “music” won’t be relevant, so it’s best to remove them and keep the page uncluttered.
- After you have made your selections, hit “save.”
Changing Your Classic Facebook Author Page Template
For authors who do not have the new Facebook page experience, there are several templates to choose from that will change the information available on your Facebook Author Page.
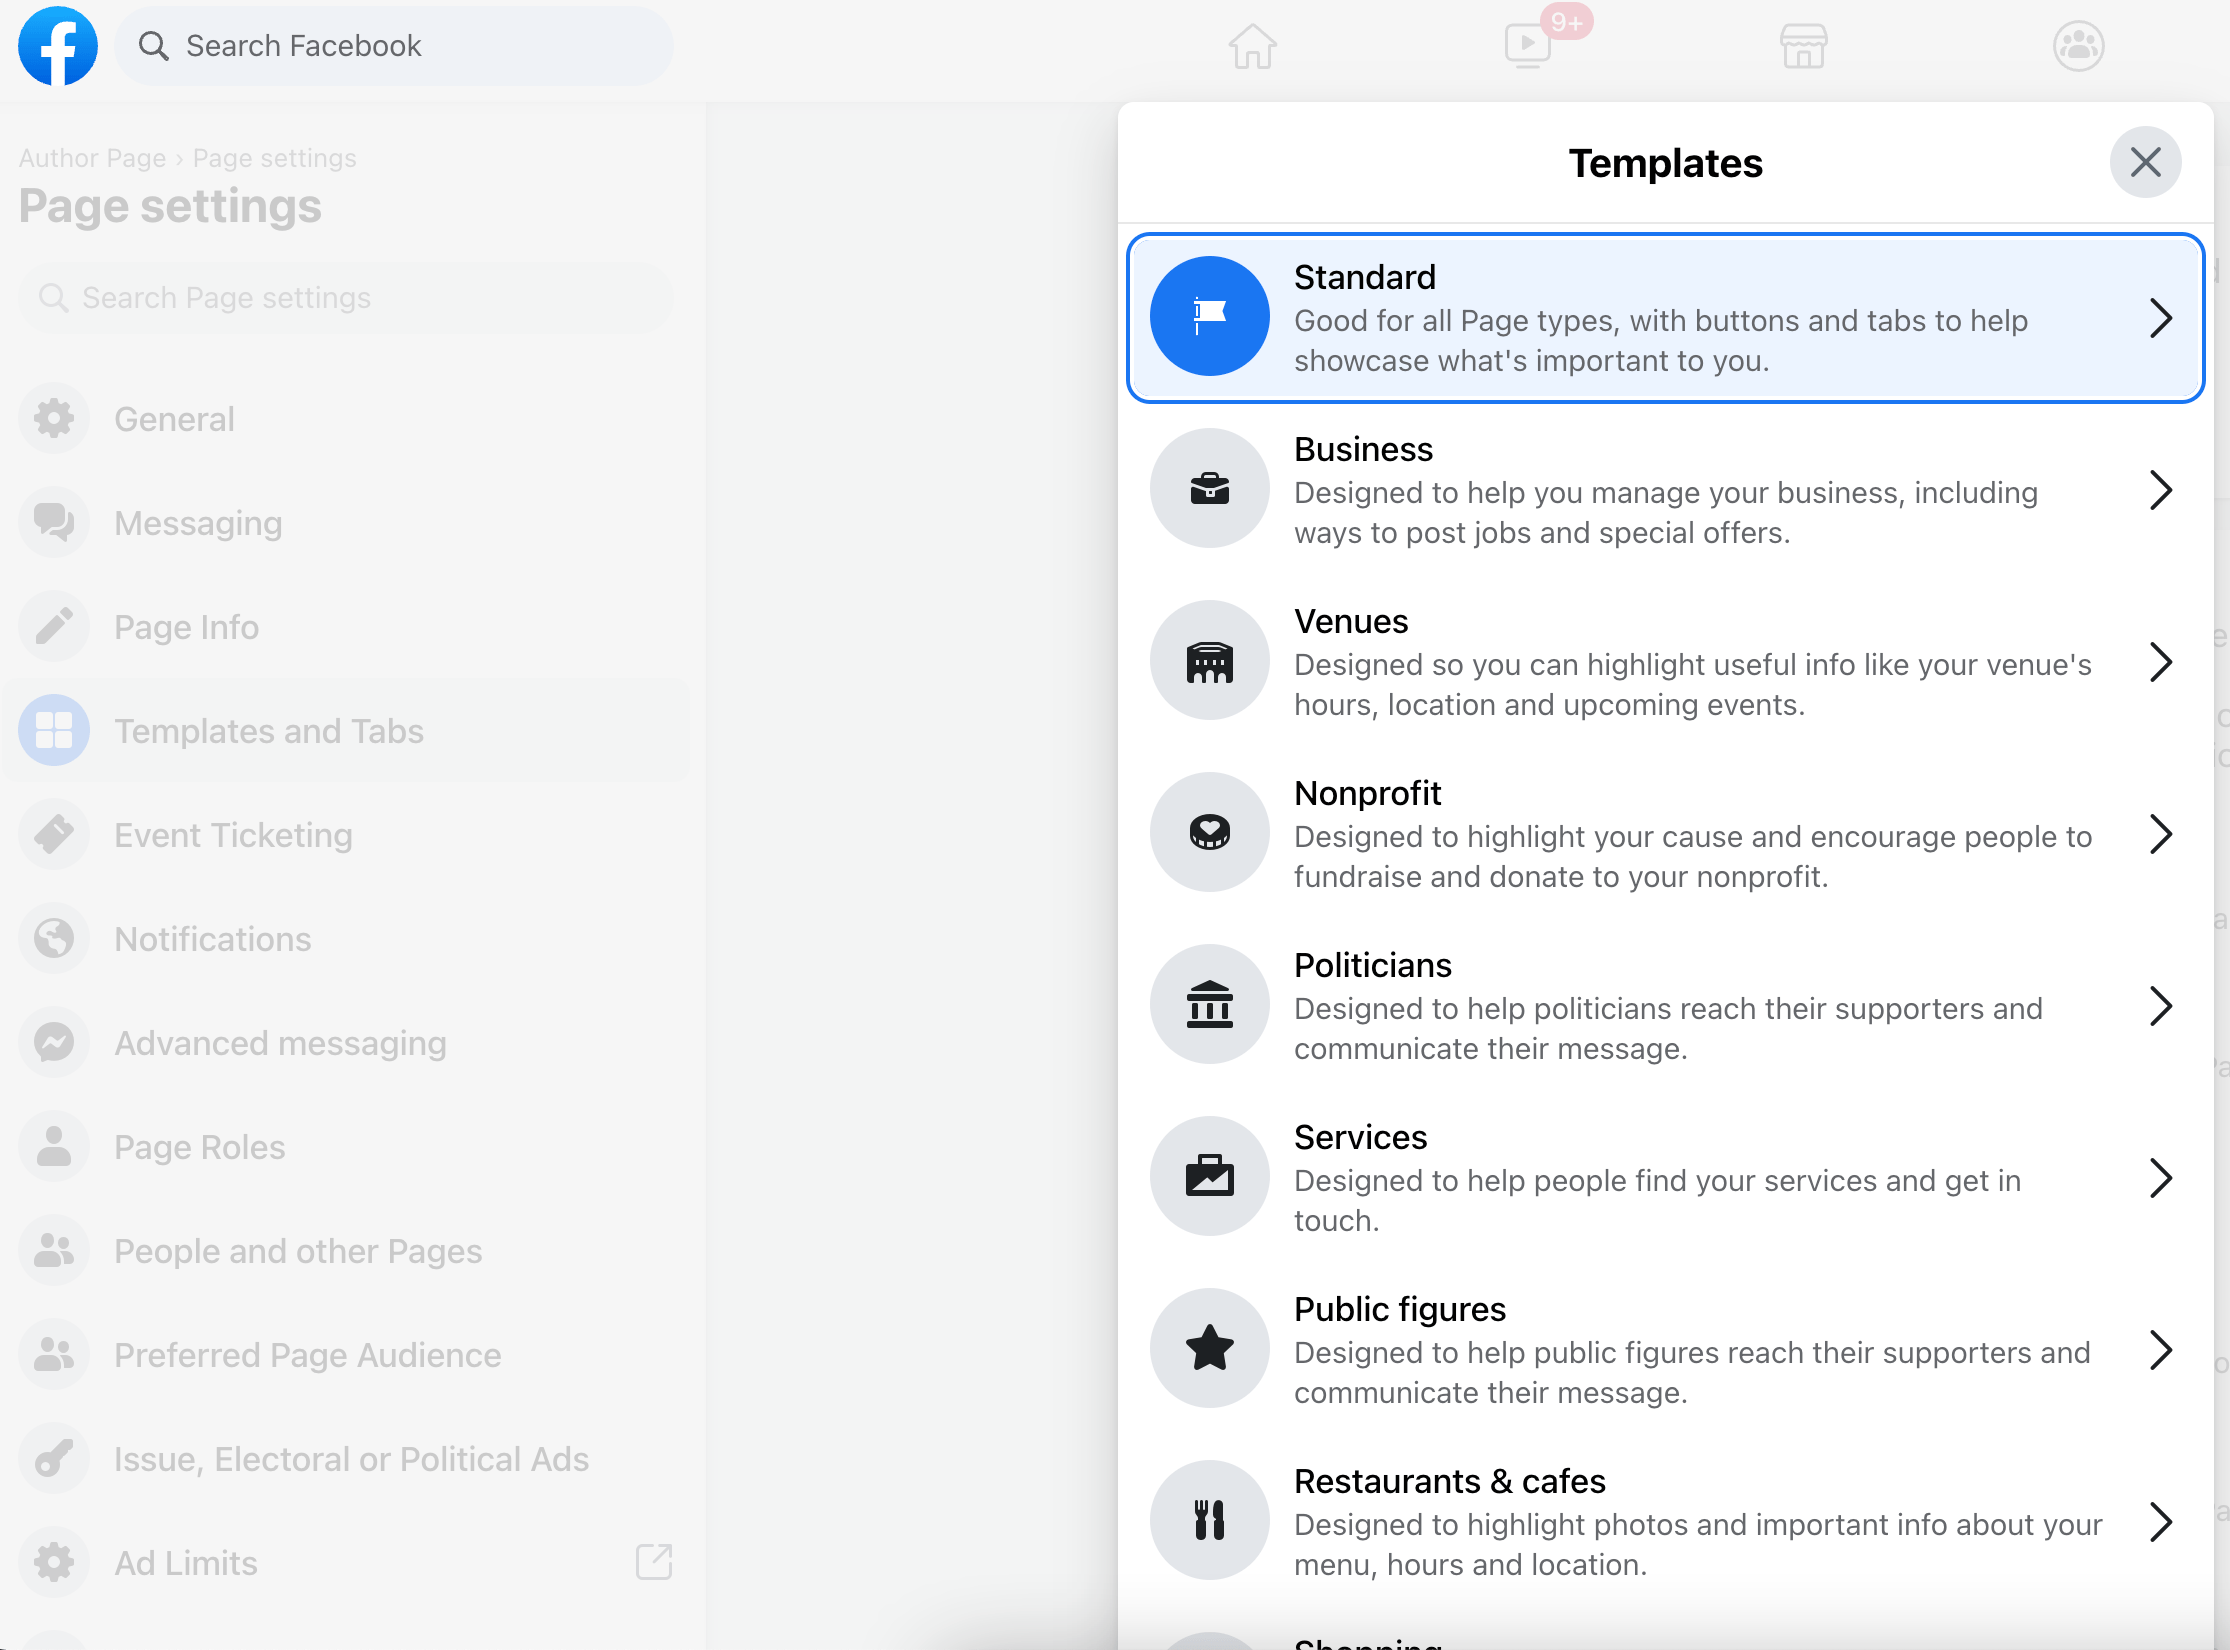
Available Templates for your Facebook Page are:
- Standard (you’ll pick this one)
- Business
- Venues
- Nonprofit
- Politicians
- Services
- Restaurants & cafes
- Shopping
- Video page
You’ll notice none of these say “For Authors” but we’ve found that the Standard template is the best for authors to promote their books in the most direct way possible. Previously, Facebook allowed pages with the Shopping template to list products for sale on other sites. Unfortunately, that functionality has been removed.
Changing Your Template
You likely have the standard template selected, but, just in case you don’t, here’s how to change it.
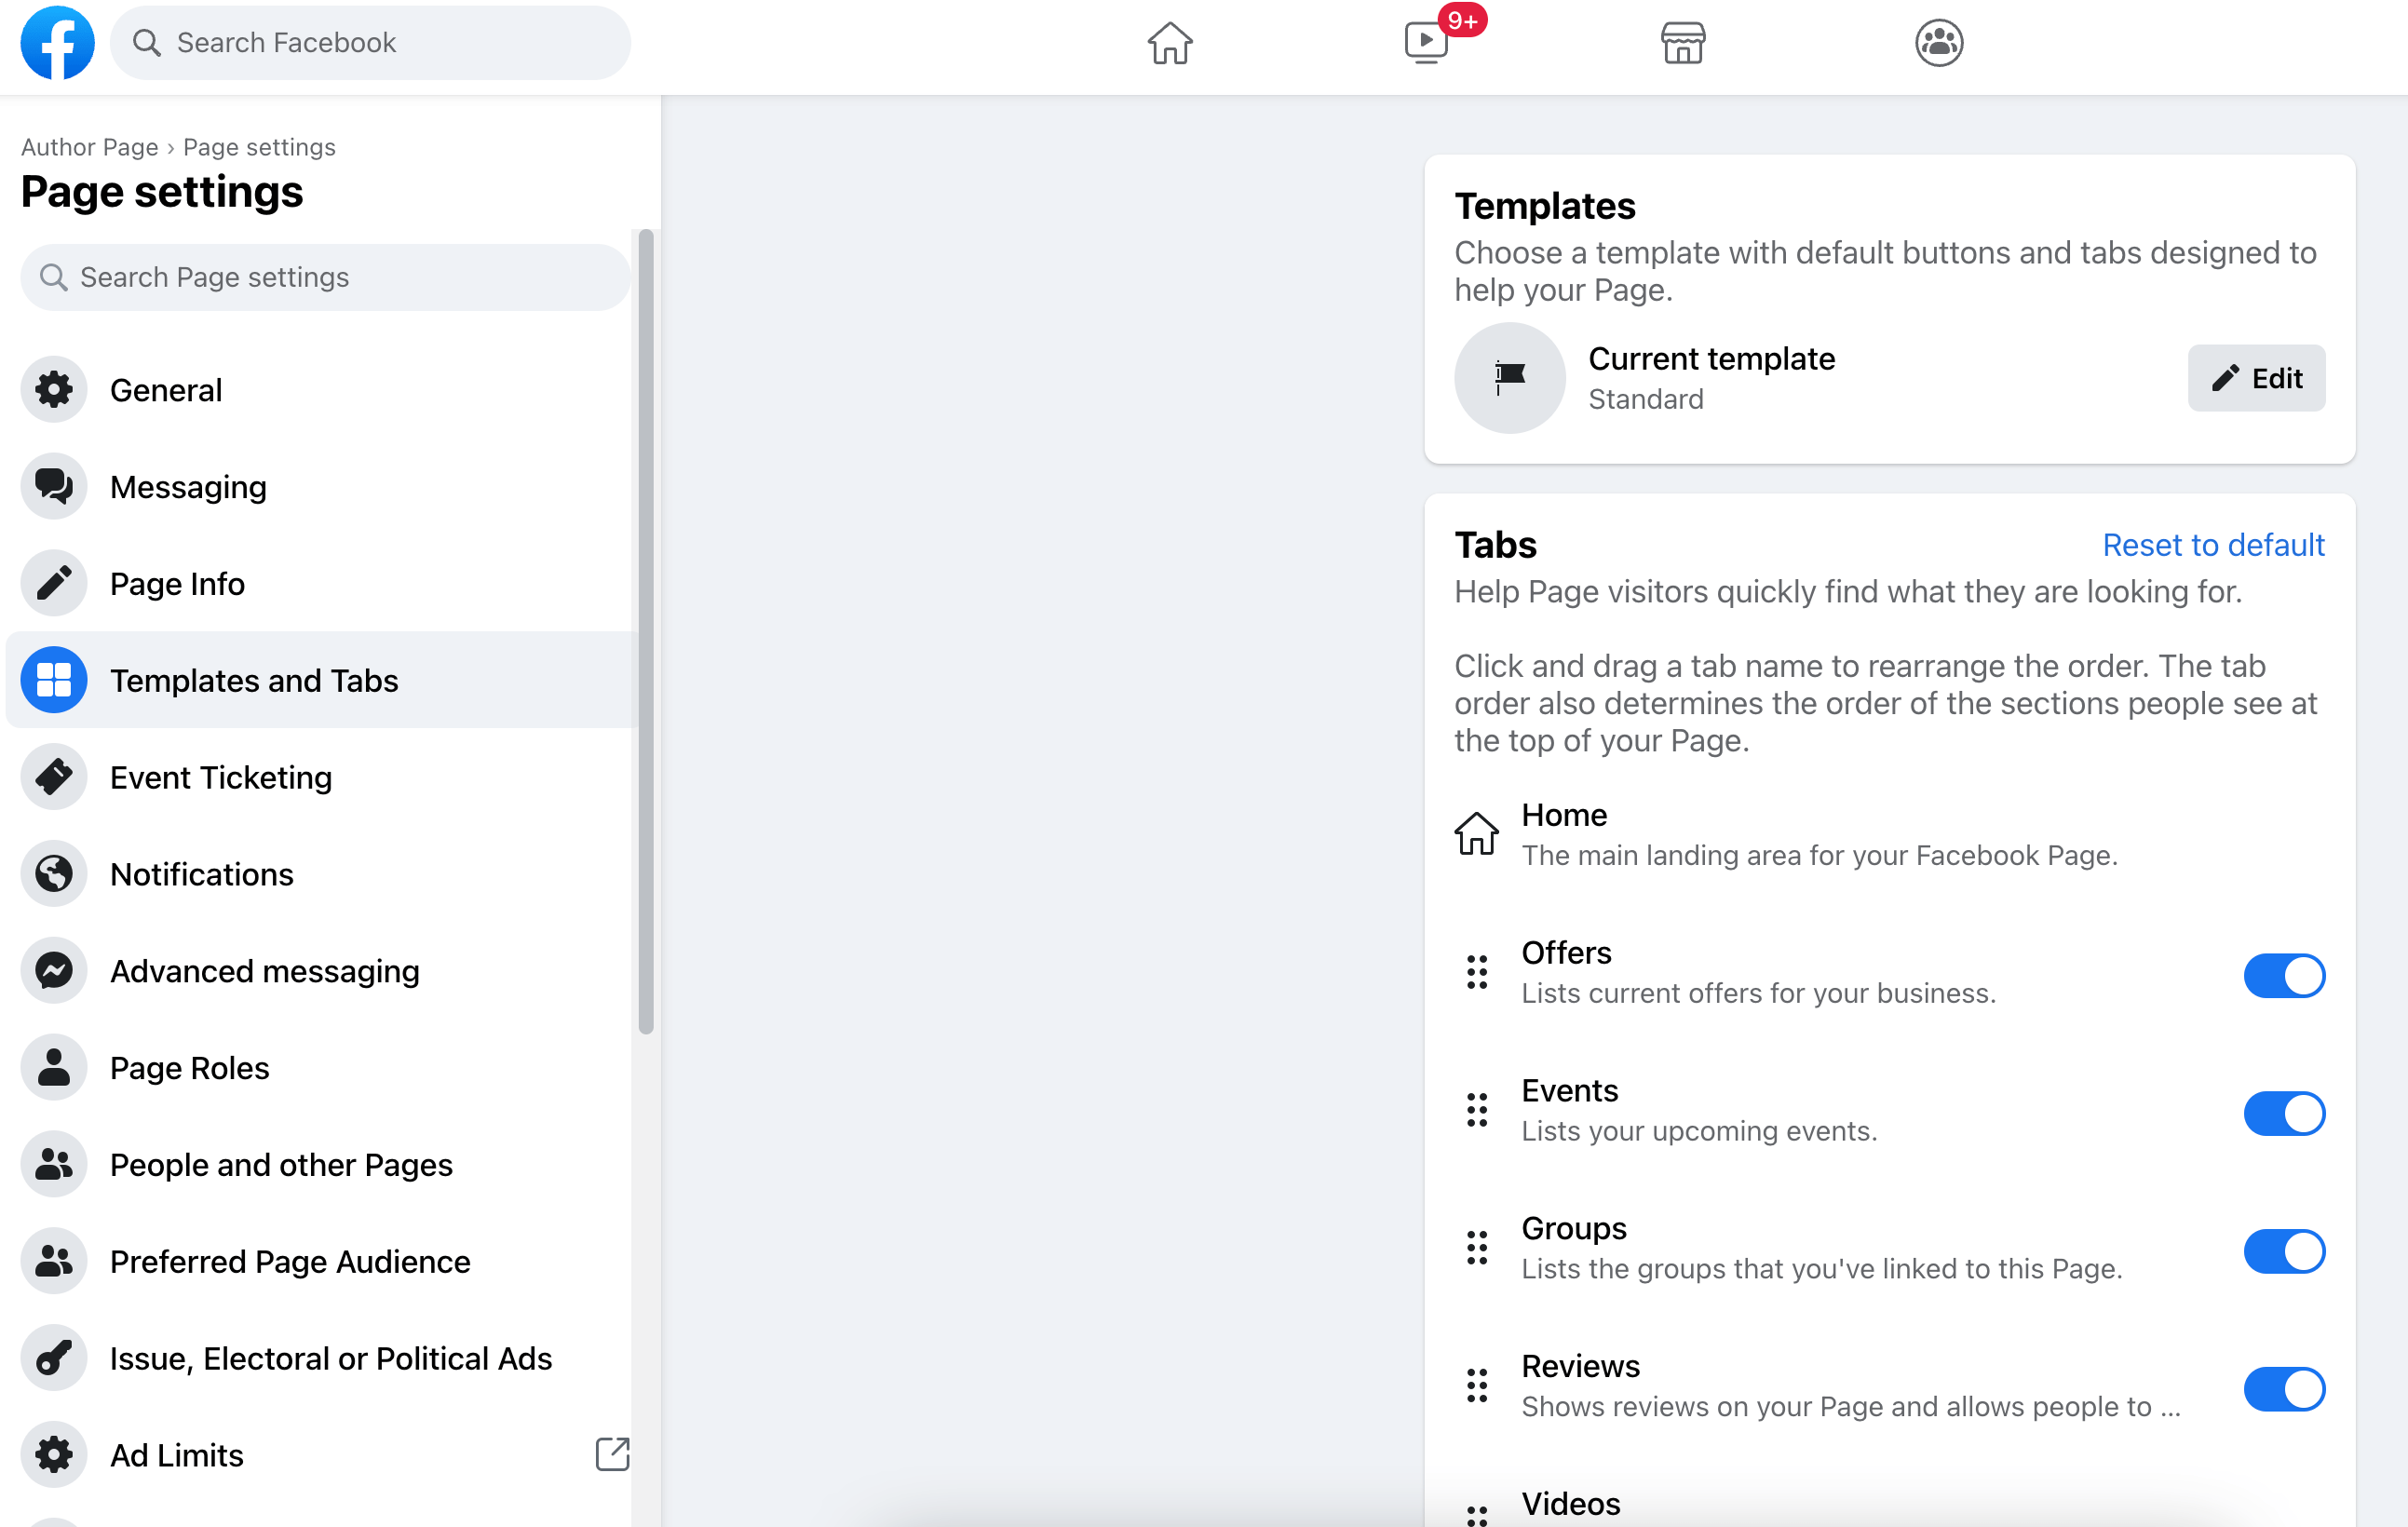
- Click on Settings from the left-hand of the screen (under “Manage Page”) when looking at your Author Page. You may need to scroll to the bottom of this list to find it.
- Select Templates and Tabs on the left side of the screen.
- Click the “Standard” button from all the template options.
- Click the “Apply Template” button.
Setting Up Your Tabs
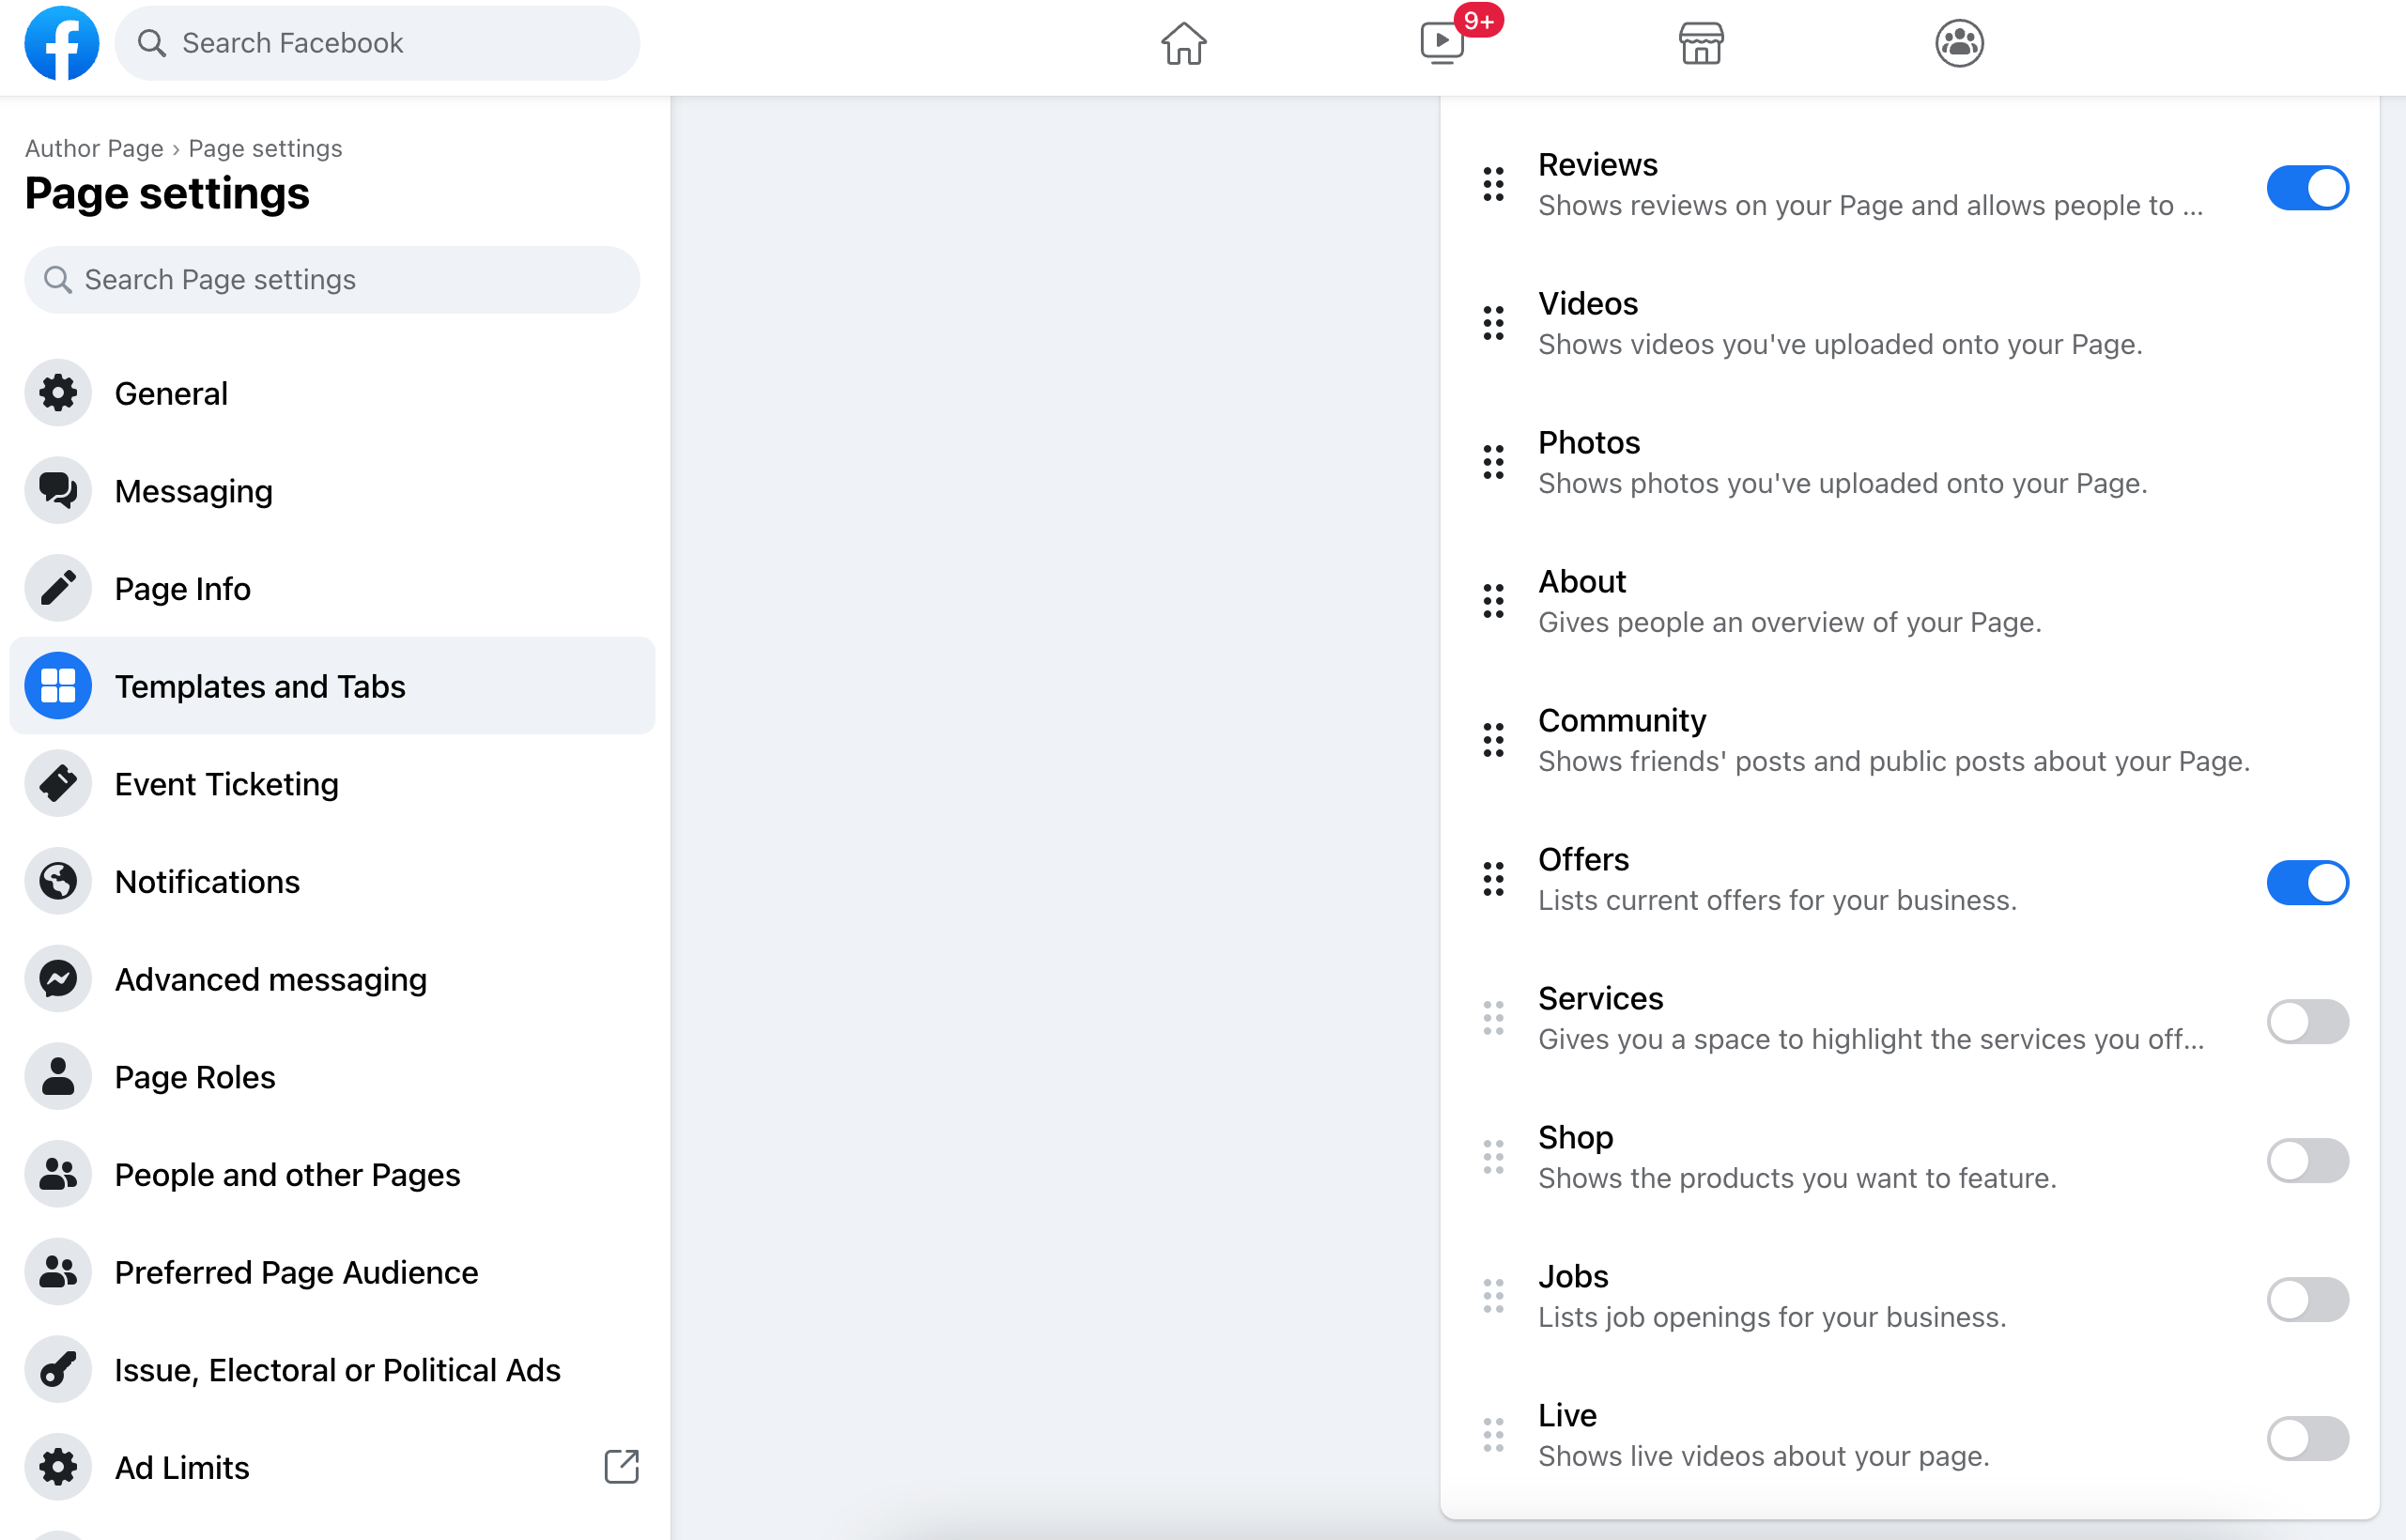
Once you’ve chosen your template, a system of default tabs will appear below it. You’ll need to turn on the Offers tab, which will show the books you have for sale. Turning on the Offers tab is easy. Here are the steps:
- From the Templates and Tabs page, scroll down to the bottom of the list that says “Tabs.”
- Turn on the toggle next to “Offers.”
You should now re-order all of your tabs to put Offers first, and then list the Events tab second. Re-ordering the tabs is easy, just click and drag. Here are the steps:
- Stay on the Templates and Tabs page.
- All the Tabs are listed in the order they’re displayed on your page.
- Click and drag the six black dots next to the word Offers to move it to the first position.
- Click and drag the Events tab to the second position.
Setting Up Your Offers
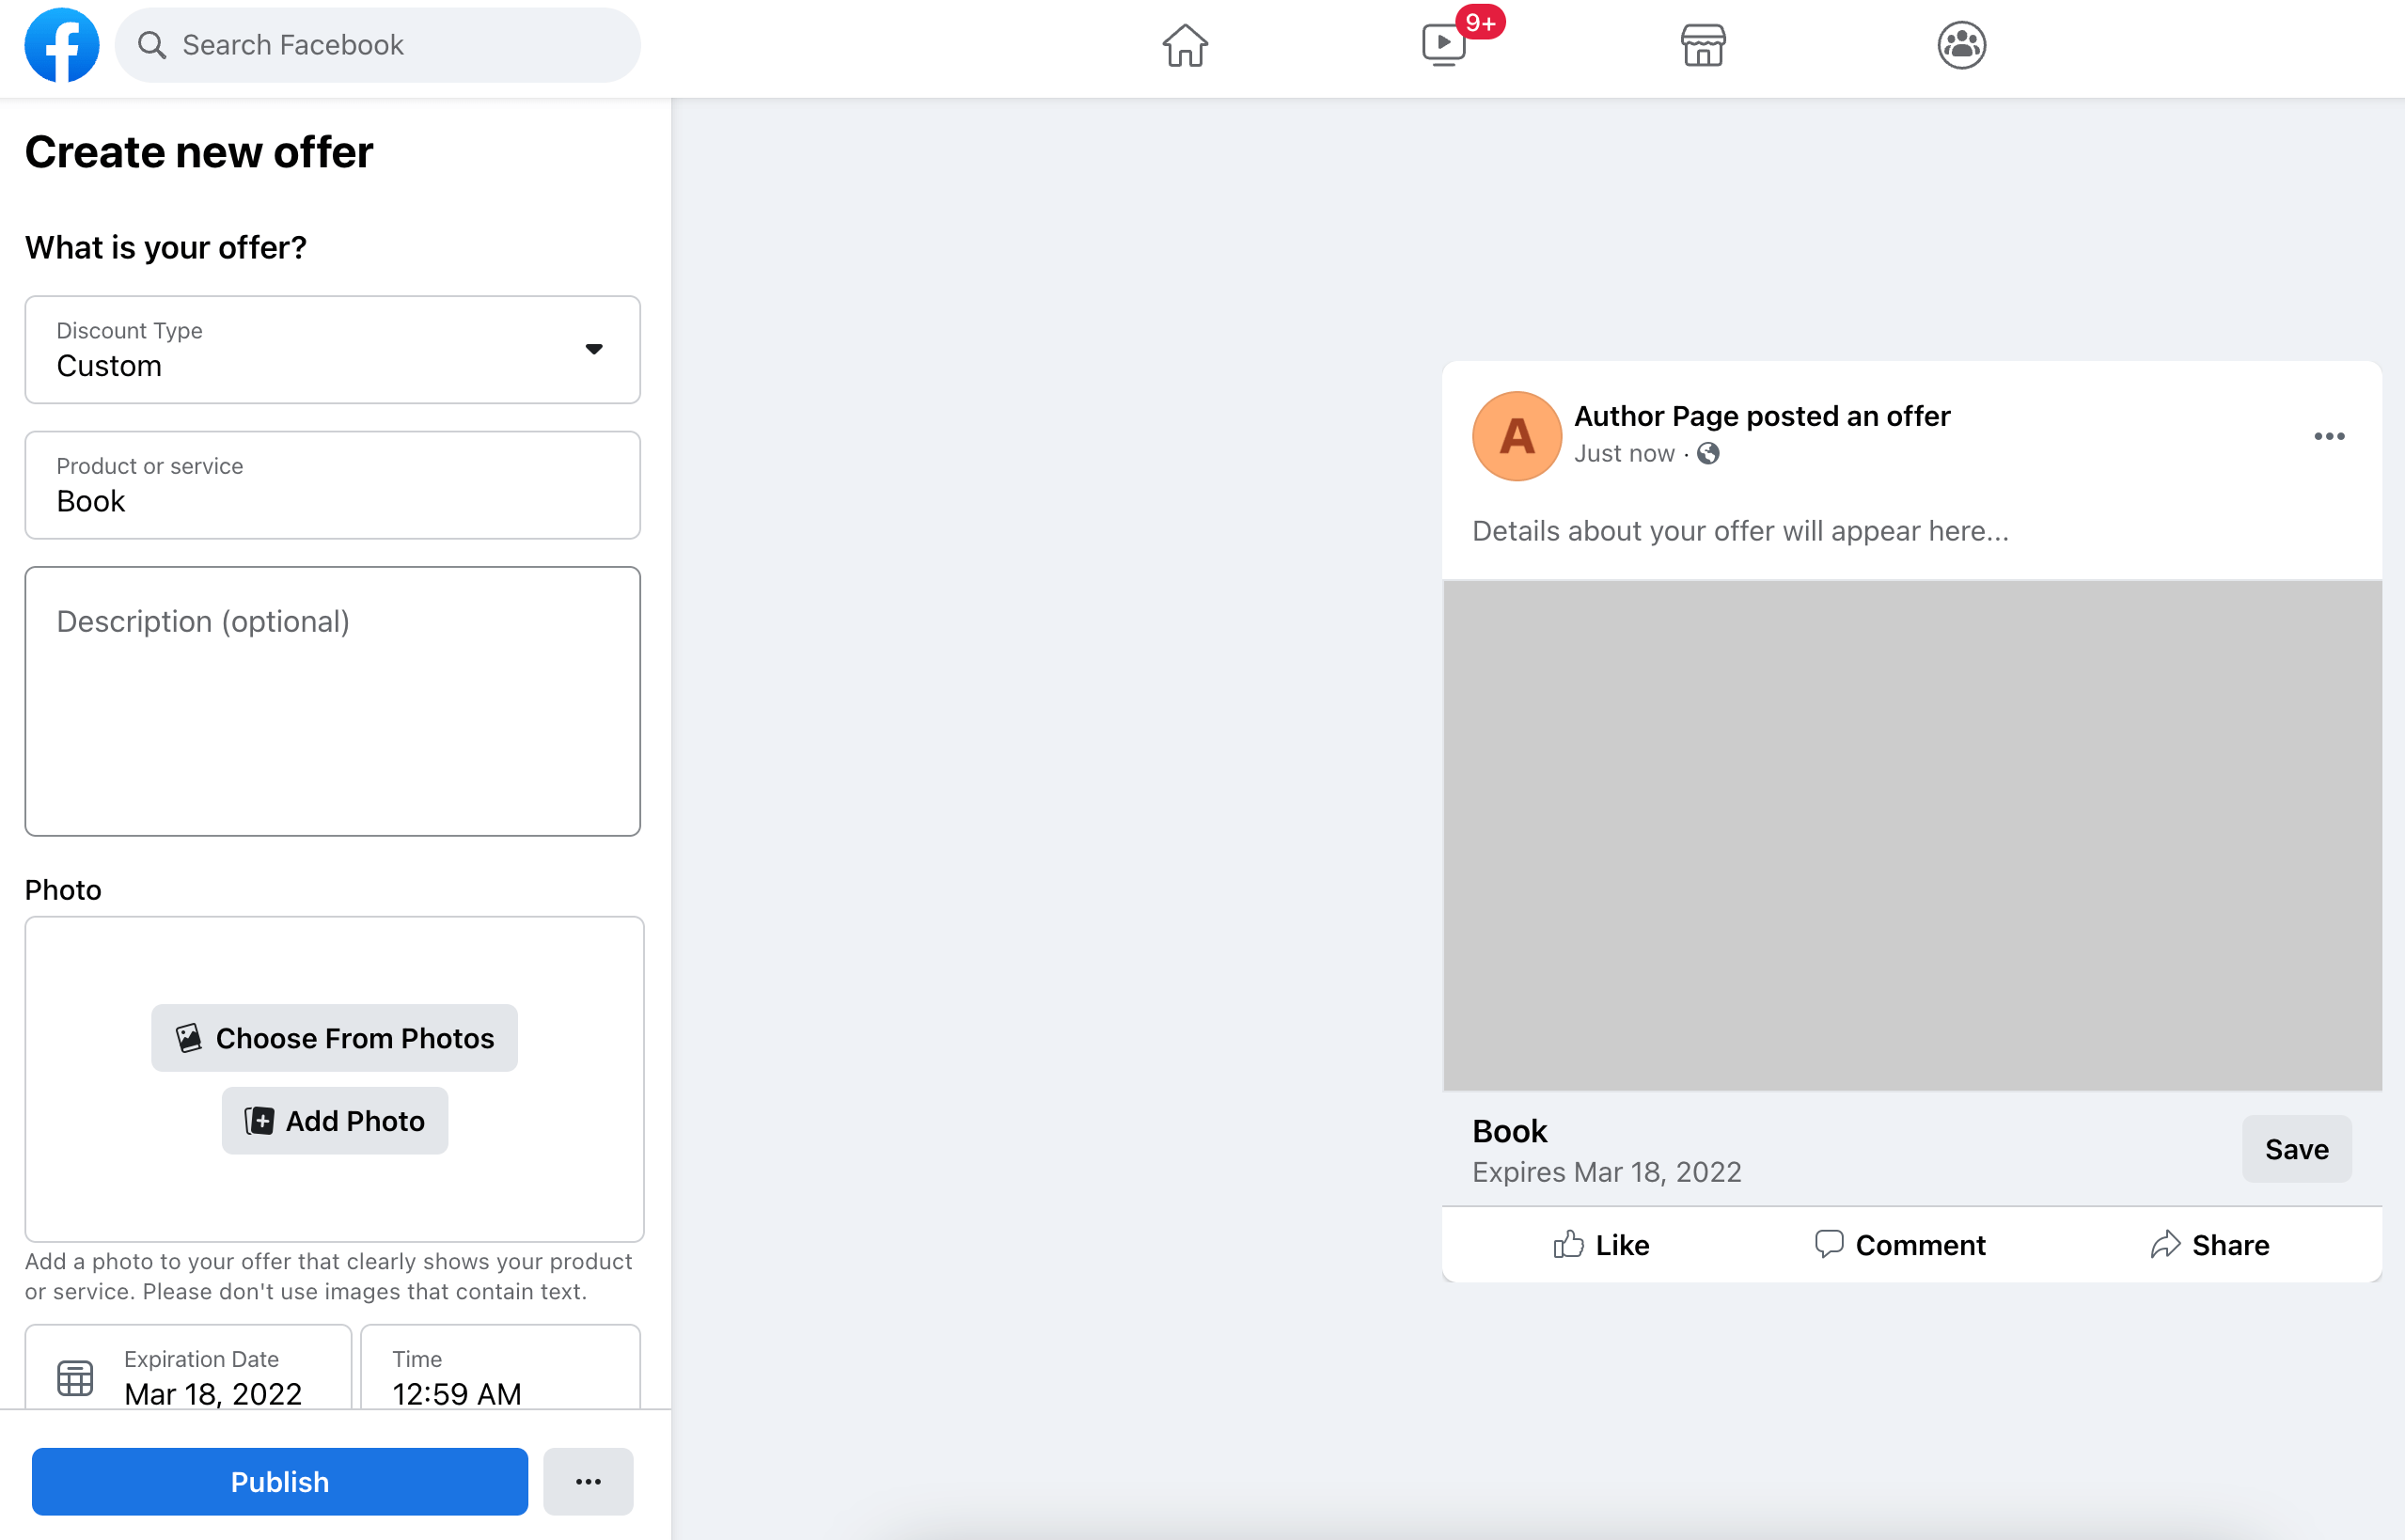
The best way for authors to list their books on Facebook is to make an offer for each title on their Author Page. To start creating offers, go back to your Author Page, click on the Offers tab, and select Create Offer.
On the left side of the screen under “Create new offer,” change the Discount type to Custom.
You can then enter your book title under “Product or service” and your book description under “Description (optional).”
Next, click Add Photo on the left-hand side of the screen, and upload an image that contains your book cover. This image must be at least 500 pixels wide and 262 pixels tall, so just your cover won’t work. We recommend using a program like Canva to put something together with a nice wide background.
Then, set the offer to expire as far in the future as possible. Generally, this is a year from the day you are creating the offer (you can always create a new offer for the book after the first one expires, so we recommend setting a reminder or calendar event for next year).
Under “Where is this offer available?” select Online and enter a URL of a page where readers can buy your book. For most authors, this will be an Amazon link.
Make sure Shop Now is selected under “Button,” and provide information on any relevant terms & conditions or promotional codes.
Hit publish!
Customizing Your Offer Button
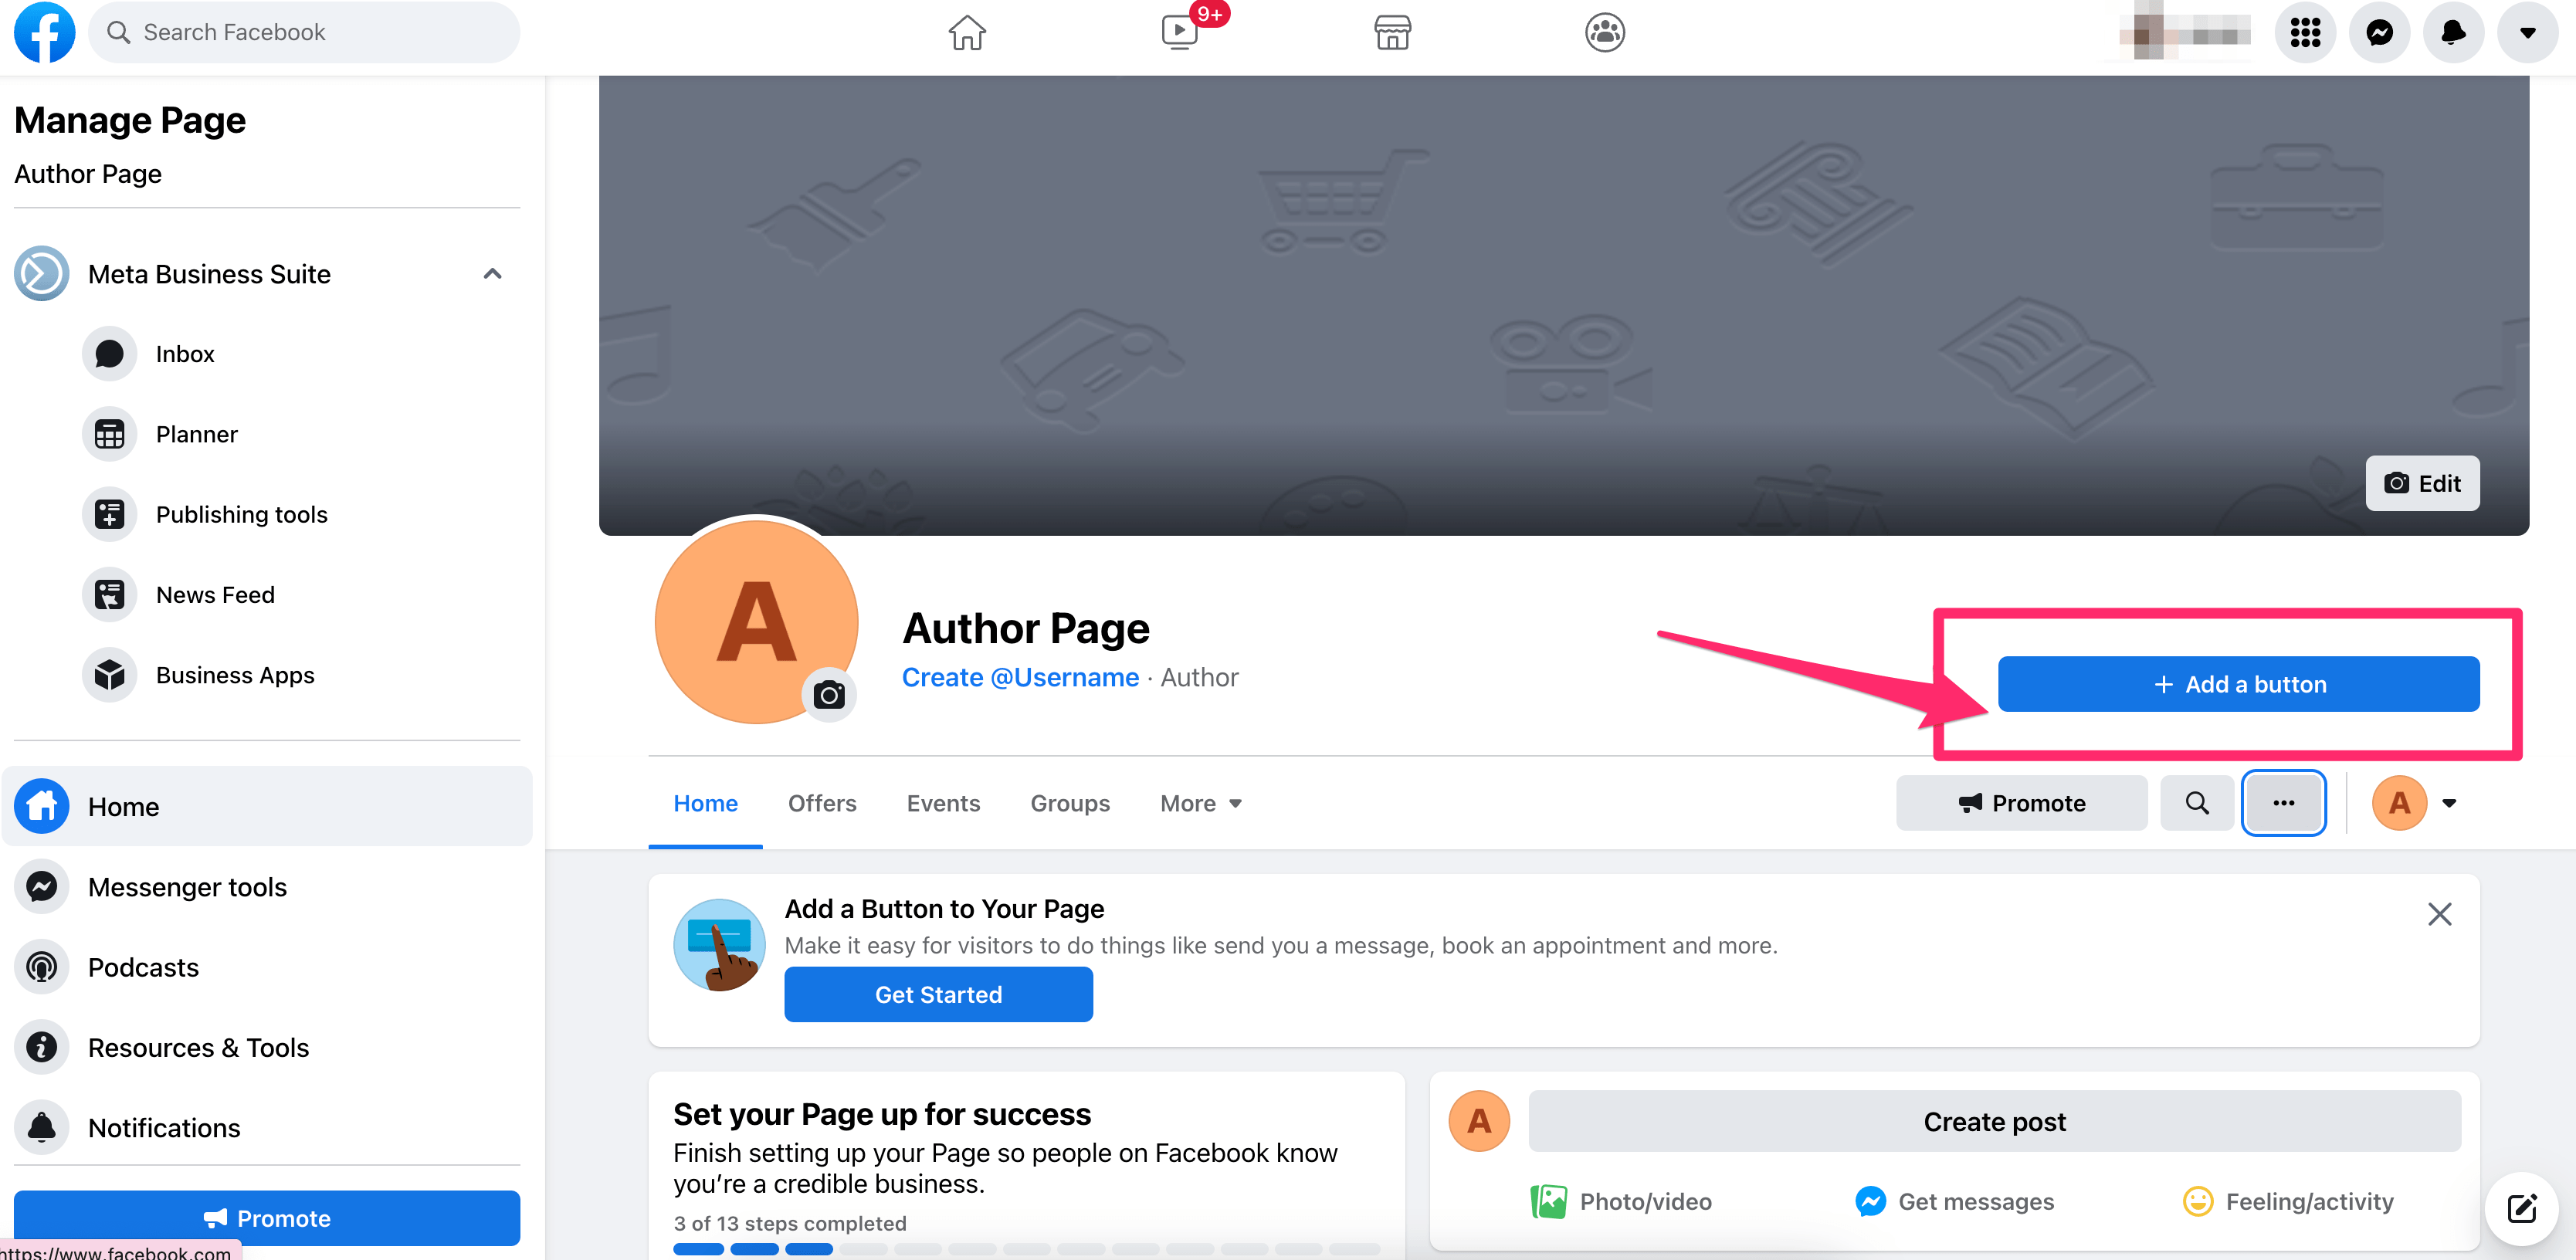
Under your Author Page’s cover image on the right side of the screen, you have the option to add a custom button for your offers. Here, you can direct readers to your Amazon page or website with just one click.
- Click on the blue button that says “+ Add a button.”
- Choose the Shop on Website option from the bottom of the list.
- Enter a link to your Author Page on Amazon, or another general location where readers can find all of your work.
- Click Save.
Now readers can click your shop now button to see all of your work.
Create an Event
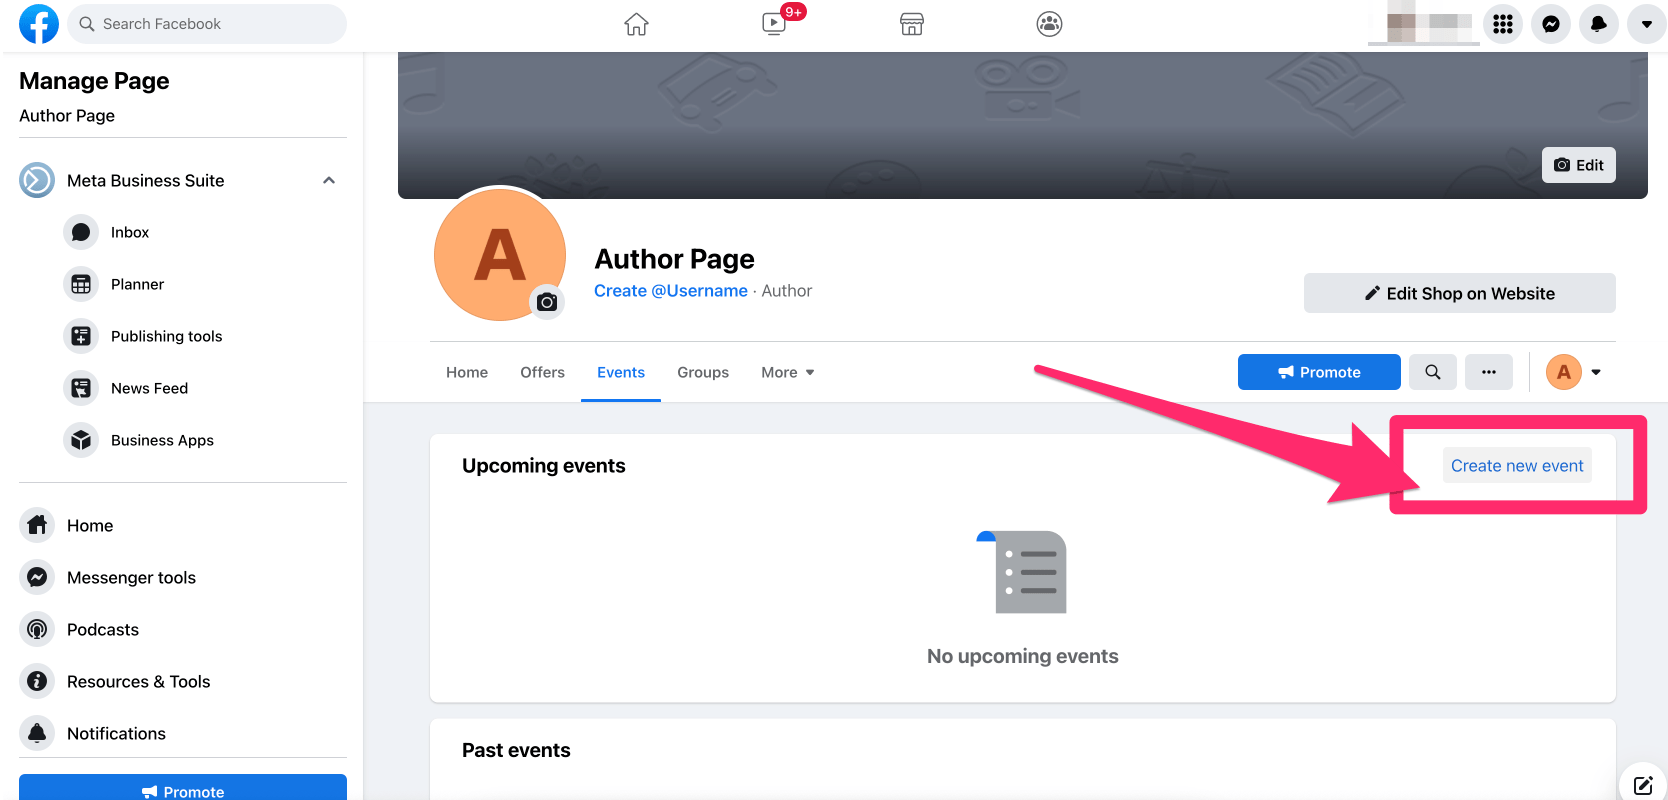
Are you going to be at a conference or a local event and want to let your readers know? Set up a Facebook Event to let your followers know when and where you will be. To create an event, go back to your Author Page, click on the Events tab, and then click “Create new event” in the upper right-hand corner.
Fill out all of the information for an online or in-person event in the form that appears. Then, publish or schedule the event for when you want it to go up.
That’s It!
Once you’ve followed these steps, you’ll have a Facebook Author Page optimized for book sales and event engagement. With nearly two billion daily Facebook users, devoting some time to optimizing your Author Page is a great way to reach more readers. The easier it is to purchase a book, the more likely readers are to buy it. With an easily accessible shop, event listings, and advanced publishing tools, Facebook is a great platform for turning potential readers into fans.
Note: This article was last updated in February 2022. Facebook often changes how its pages work, so we will strive to keep this post up to date. Please let us know if you have any suggestions to improve it.




I don’t have an Edit Page option under settings. I tried it through my personal page and my author page. Is this just available to certain pages, I wonder?
I see! You’re not talking about settings under the account settings. I watched your video again and got it figured out. Thanks – great tips!
I had this same issue! I kept ending up in the Facebook account settings. Finally I saw the page Settings…I was beginning to think I was crazy!
This was a fantastic post! The video clips made this process so easy. Thanks so much for these tips, Chloe!
Thanks, Chloe! Took the pain ou of it. I originally had it set up for email subscriber conversion, but they changed the FB settings or something, so, now with your help, I’ve optimized it for sales. 😉
A very useful article. Have just followed all the steps and got my store up and running. Didn’t know about any of this!
Thanks so much! I just set up my Facebook shop! Your directions were perfect 🙂
Thank you for posting this. I had no idea this was available, but with your instructions I was able to change my page easily. Thank you!
When I click on “Shop” in the left-hand column to set up the shop I didn’t get a pop-up box. It says “Finish Setting Up Your Page” and wants me to use Stripe or Paypal. How do I get back to Terms and Policies and Checkout Method?
Hi Mike, I played around with this and unfortunately it looks like in order to get back to the pop up where you select “checkout on another website” is to delete the shop and start over from the beginning again.
Ho w do you delete the shop? I have the same issue.
Thank you . I love the step by step instructions.
Do you have to pay Facebook a commission for selling your products there? If so, how much?
Hi Jade, When you click “check out on another website” when you set up your store, you are still selling your books through Amazon, and simply using the Facebook store to drive traffic to your titles. Since this is the case, and Facebook isn’t actually collecting any funds for you, no, you don’t pay a commission.
Hey Jenna, sorry for the trouble and thank you for pointing out the issue. It looks like Facebook has changed their shopping options, and unless you already have it set up, you can no longer use the shopping tab to check out on another site.
We have researched the new options and updated the article with new best practices for authors that don’t have the old shopping options.
Thanks for this valuable info. Can’t wait to get started!!!
Thank you for the great, easy to follow post! I just updated my Facebook page!
Very helpful information! I just updated my page!
Chloe, Facebook is definitely a number one platform for authors! You can promote, engage and even sell books! The best option they came up with, I agree!
Great post, exactly what I needed when I needed it, thank you!
Awesome article. As a author and publisher, I am always asked about ways to sell more books using social media. This is excellent. I am sharing this post with all of my authors. Thank you so much.V
The option of proving a checkout URL is not there.
Any idea why? Not usable ottherwise.
Hi Kathy, It’s likely that you selected “check out on Facebook” instead of “checkout on another website” option when you set up your shop. Under the first option, you sell directly through Facebook (which is not recommended). Under the second option, you can direct readers to Amazon to download your books. Unfortunately, the only way to re-set this setting is to delete your shop and start the process from the beginning again. When you have selected “checkout on another website”, you should always have a URL field in the product settings.
Thank you for sharing! This was super-easy to do. I appreciate you!
It works but it doesn’t let me put in my amazon affiliate link in the URL slot.
Hi Ann, I was able to append the affiliate tag to the end of our Amazon link. Make sure that you selected the “checkout on another website” option when you set up your shop. That will allow you to direct readers to the amazon page using whatever link you’d like.
Thank you! Thank you! Thank you! So easy to set up.
Great article, and very useful. But while I did everything as described, when I had a product in my shop, I don’t have the Check Out URL appearing in the options. I’m trying to figure out what I did wrong but it is a big mystery for me!
Hi Patrice, It’s likely that you selected “check out on Facebook” instead of “checkout on another website” option when you set up your shop. Under the first option, you sell directly through Facebook (which is not recommended). Under the second option, you can direct readers to Amazon to download your books. Unfortunately, the only way to re-set this setting is to delete your shop and start the process from the beginning again. When you have selected “checkout on another website”, you should always have a URL field in the product settings.
It seems the “checkout on another website” is no longer an option. Did I miss something?
Hi James,
I’m sorry to hear that you’re experiencing difficulties. I just tried created a page from scratch and I was given the option to choose “Check Out on Another Website” as I was setting up my store, so all seems to be in order as far as I can tell.
You are correct. My mistake.
Great article and so easy to follow- Your the master!
Thanks for the tip! I put it in use right away.
Thanks a lot. Your posts are so enlightening. I do enjoy your engaging styles.
Cheers! My Facebook Author page looks much nicer now!
for the link to Amazon, I suggest you use an affiliate link – That way you will earn commission on any click through sales in addition to your book sale.
I’m pretty sure that this is against the affiliate/bookseller terms of service. I’ve been told Amazon really does not want us authors “double-dipping.” You may want to look around K-boards or some other venues.
When I switch to the Shopping layout there is no shop tab option. I get events now, but no shop tab. 🙁 Is this something only available in the US?
Hi Ashley – it’s possible they are rolling this out slowly. Keep checking back and hopefully you will have the shop tabs soon.
Thank you Chloe, absolutely brilliant advice!
Great article, but I never get the option to choose where to check out. It jumps straight from terms and conditions to paypal or stripe. Any idea how I can force this? Thanks!
Hi Helen,
Unfortunately, no, I don’t have any recommendations for how to guarantee that you get that option. Sorry we can’t be of more assistance!
I’m not sure we’re allowed to use a Facebook Shop for ebook sales. Facebook wording in two different places gives me concern about this:
1. In the Commerce Policy here – https://www.facebook.com/policies/commerce – which is part of the Seller’s Terms & Policies we must accept when setting up the shop, #12 states “Non-physical items are prohibited on Facebook Marketplace, including but not limited to services, subscriptions, digital products, or rentals.”
2. In the Facebook Business help section here – https://www.facebook.com/business/help/846547442125798 – the Shop Section states, “Note: You can’t sell things like services or digital goods through your shop section. At this time, you can only sell physical products.”
On these pages, Facebook makes no distinction between items we sell directly via Facebook and items for which we send customers to external sites like Amazon to check out. For this reason, I’m reluctant to set this up.
Does anyone have confirmation from Facebook one way or the other?
Hi Betty,
Our understanding is that digital downloads cannot be sold directly through the Facebook Marketplace, however, it is appropriate to push customers to a third party retailer where they can download digital products. You cannot use Facebook to sell digital products directly in part because they lack the functionality to act as that type of store: whereby a customer pays for a digital download, and can immediately download it from the store. When you send the reader to another retailer to download, however, you are bypassing this concern, since the transaction isn’t taking place on Facebook at all.
Hi Ms Chloe!
You have been a BIG help for my Facebook author page! Big thank you to youuuuuu!!!
Monique
Reblogged on Wind Eggs http://www.ptstephens.com.
Much happier with my page. Not finished, but your guidelines and instructions have been most valuable.
Very cool. Thank you for this, Chloe.
I’m wide and really would like to see some sales shifted to some of the other sellers. Is it okay to list the same books multiple times but indicate they’re for the other stores?
Would be interested in this answer please.
You can absolutely list the same book multiple times, directing to different retailers. You’d just want to be sure to label them all in a clear manner so that readers don’t get confused.
As of today (March 26) I cannot find an “Apply Template” button on the Shopping template option anymore. After you go into View Details there is not button there that I can find. I went in to change the template on a client’s page today and found that option is no longer available. Anybody else seeing that? I have it changed on my own page (did it in January) and it is still working but can’t seem to find the option on pages now with the Standard template.
Hi Chris,
I just made a dummy page and found all of the options still available. I’m sorry that I can’t be of more help, since I’m not experiencing the same issue.
This is a very helpful article, but when trying to set up my page, I find that I don’t have a ‘Shop’ button. I’m wondering if I did something wrong.
Hi J.B., There is a chance that Facebook is rolling this feature out slowly (as they often do) and thus it isn’t available to all users yet.
Is there an initial or ongoing fee charged to me for selling my books through a shopping template on Facebook? I haven’t found any mention of fees so far.
Hi Dan,
No, when you sell through a third party seller using Facebook’s shopping template, there is no fee.
Fantastic article. I’ve set up several Facebook pages and it can be confusing sometimes. I added your article to my recommended links page, it’s a great resource for my readers.
Thanks again.
There is no template option on my page – where do I go from here?
Hi Mandy, There is a chance that Facebook is rolling this feature out slowly (as they often do) and thus it isn’t available to all users yet.
I was going to ask the same thing
Hi Ellen, you don’t technically need both, but they are both great ways for your readers to view your books and get a feel for you as an author. We always recommend people do as much as they can to connect with readers!
Thank you … this is awesome.
This is the best article I’ve found so far for a new author that is also new to facebook.
Is this still relevant? It looks like it was written in 2017.
Hey Nicole! This was last updated in December 2022 as Facebook often makes updates to their interface.